Friends, in today’s blog, we will go through a basic Canva tutorial for beginners. We will explore Canva’s fundamental features so that you can create high-quality designs—such as posters, banners, flex prints, ID cards, visiting cards, brochures, and more. Once you understand the basics of Canva, you can create designs without needing complex software and customize them with ease. You get access to a wide range of ready-made templates here. Much like other software, it allows for easy editing, including color, text, and image adjustments. Canva is widely used today because it makes tasks quick and simple. You simply need to search for “Canva” on Google and log in using any email ID. While “Pro” options are available, you can still create excellent designs without a Pro subscription. So, let’s learn how to use it through seven steps.
We will cover this in Seven steps. After reading this blog, be sure to watch the video tutorial; you can find the link to the video at the bottom of the page.
Step (1):-
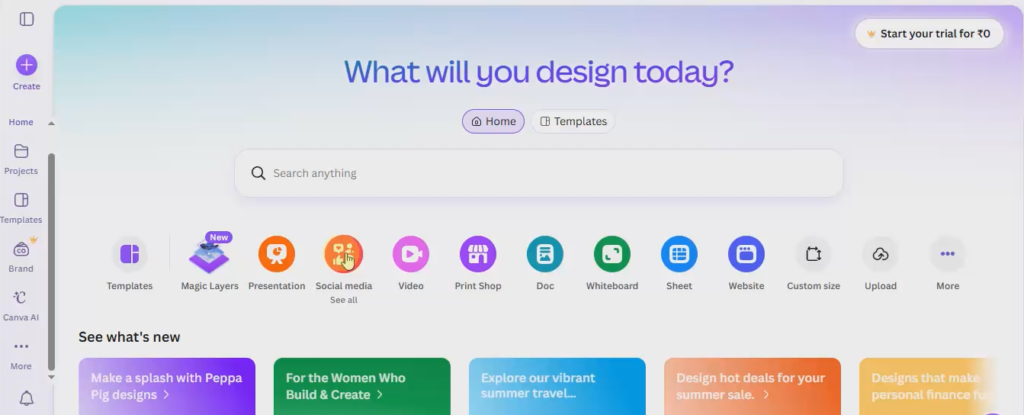
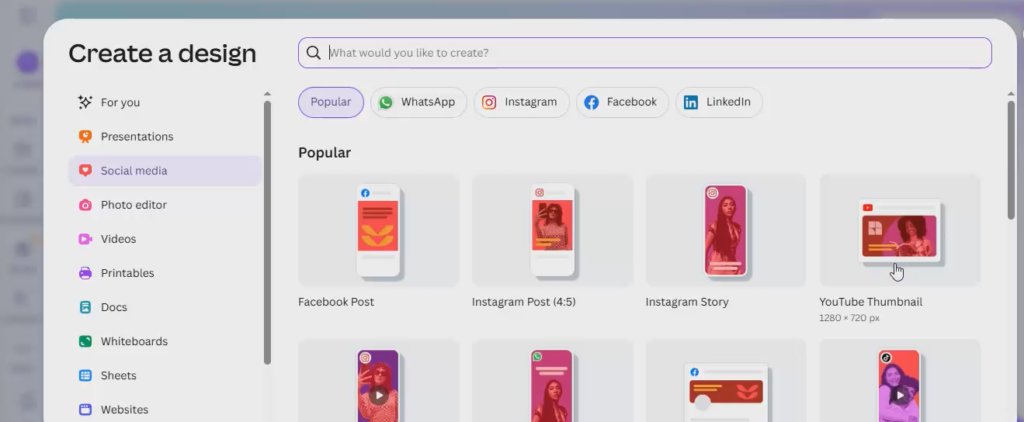
First, go to Google, search for “Canva,” and log in with any email ID to open the Canva dashboard. Scroll down slightly and click on the “Social Media” option. You will see various social media-related page formats—specifically, templates with specific aspect ratios—such as YouTube thumbnails, Instagram Reels, Facebook Reels, Facebook banners, YouTube banners, and many other options for creating social media content.
Step (2):-
Click on the “Create” option located at the top-left corner; a box will appear. Within this box, look towards the lower-left section and click on “Custom size.” You can specify any size you prefer here; as soon as you enter a size, a blank page will be created. You can create any design you like on this blank page. Alternatively, click on the ‘Templates’ option located at the top left; here, you will find a wide range of ready-made templates. You can select and edit any template according to your needs.
Step (3):-
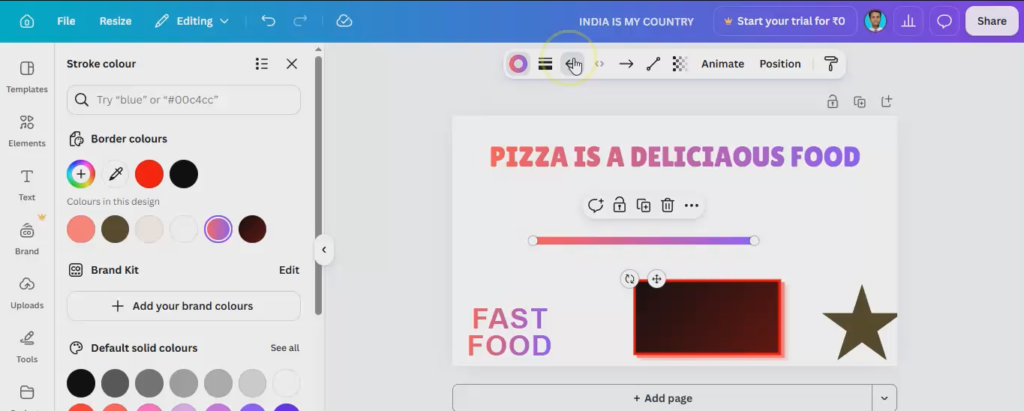
Click on the ‘Elements’ option at the top left. This feature allows you to search for or insert images directly within Canva. Once an image is inserted, you can edit it using the ‘Edit’ option at the top. You have various options here, such as adding shadows or outlines to the image. You can also make edits using the option next to the main ‘Edit’ button. Right-clicking on the image reveals additional options. Furthermore, you can apply effects and animations by clicking on the ‘Effects’ and ‘Animation’ options at the top.
Step (4):-
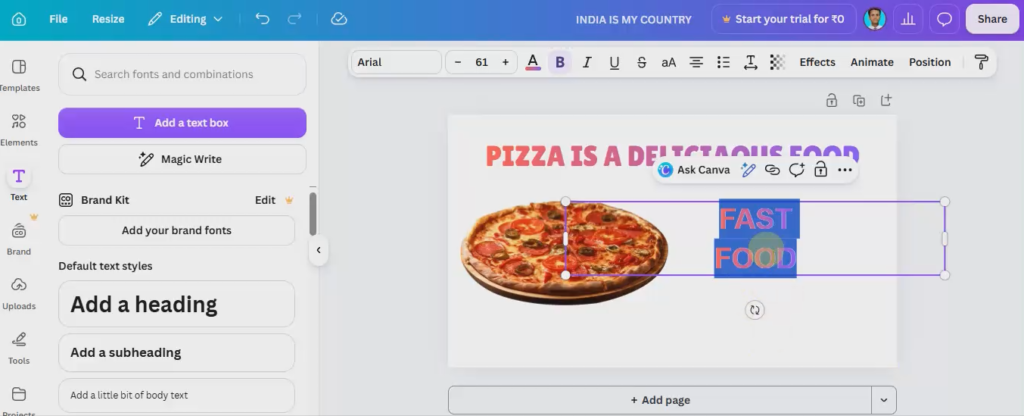
Click on the ‘Text’ option on the left and type whatever you wish. Once typed, handles will appear around the text, allowing you to adjust its width from the left and right sides. You can modify the font, color, and size using the options at the top. You can also access further editing features—such as adding outlines or shadows—via the ‘Edit’ option located nearby. Additionally, you can apply effects and animations using the ‘Effects’ and ‘Animation’ options at the top.
Step (5):-
By clicking on the ‘Upload’ option on the left, you can insert images stored on your system or those downloaded from Google.
Step (6):-
Click on the ‘Tools’ option on the left to insert various shapes. Once you have finished working on the page, you can save it by clicking the ‘Save’ option at the top; alternatively, the project saves automatically. Then, you can download it by clicking the ‘Share’ option located at the top right.
Step (7):-
You will be able to see all the pages you have created under the ‘Project’ option on the left side.
IN HINDI:-
दोस्तों, आज के ब्लॉग में हम शुरुआती लोगों के लिए Canva का एक बेसिक ट्यूटोरियल देखेंगे। हम Canva के मुख्य फ़ीचर्स के बारे में जानेंगे ताकि आप हाई-क्वालिटी डिज़ाइन बना सकें—जैसे पोस्टर, बैनर, फ़्लेक्स प्रिंट, ID कार्ड, विज़िटिंग कार्ड, ब्रोशर वगैरह। एक बार जब आप Canva की बेसिक बातें समझ जाएँगे, तो आप बिना किसी मुश्किल सॉफ़्टवेयर के डिज़ाइन बना पाएँगे और उन्हें आसानी से कस्टमाइज़ कर पाएँगे। यहाँ आपको बहुत सारे रेडी-मेड टेम्प्लेट मिलते हैं। दूसरे सॉफ़्टवेयर की तरह ही, इसमें भी आसानी से एडिटिंग की जा सकती है, जैसे रंग, टेक्स्ट और इमेज में बदलाव करना। आज Canva का बहुत ज़्यादा इस्तेमाल होता है क्योंकि यह कामों को तेज़ और आसान बनाता है। आपको बस Google पर “Canva” सर्च करना है और किसी भी ईमेल ID से लॉग इन करना है। हालाँकि इसमें “Pro” ऑप्शन भी हैं, फिर भी आप बिना Pro सब्सक्रिप्शन के बेहतरीन डिज़ाइन बना सकते हैं। तो आइए, सात स्टेप्स में इसे इस्तेमाल करना सीखते हैं।
हम इसे सात स्टेप्स में समझेंगे। इस ब्लॉग को पढ़ने के बाद, वीडियो ट्यूटोरियल ज़रूर देखें; वीडियो का लिंक पेज के नीचे दिया गया है।
स्टेप (1):-
सबसे पहले, Google पर जाएँ, “Canva” सर्च करें और Canva डैशबोर्ड खोलने के लिए किसी भी ईमेल ID से लॉग इन करें। थोड़ा नीचे स्क्रॉल करें और “Social Media” ऑप्शन पर क्लिक करें। आपको सोशल मीडिया से जुड़े कई पेज फ़ॉर्मैट दिखेंगे—खासकर खास आस्पेक्ट रेश्यो वाले टेम्प्लेट—जैसे YouTube थंबनेल, Instagram रील्स, Facebook रील्स, Facebook बैनर, YouTube बैनर और सोशल मीडिया कंटेंट बनाने के लिए कई अन्य ऑप्शन।
स्टेप (2):-
ऊपर-बाएँ कोने में मौजूद “Create” ऑप्शन पर क्लिक करें; एक बॉक्स दिखेगा। इस बॉक्स में, नीचे-बाएँ हिस्से में देखें और “Custom size” पर क्लिक करें। आप यहाँ अपनी पसंद का कोई भी साइज़ चुन सकते हैं; साइज़ डालते ही एक खाली पेज बन जाएगा। आप इस खाली पेज पर अपनी पसंद का कोई भी डिज़ाइन बना सकते हैं। या फिर, ऊपर-बाएँ कोने में मौजूद ‘Templates’ ऑप्शन पर क्लिक करें; यहाँ आपको बहुत सारे रेडी-मेड टेम्प्लेट मिलेंगे। आप अपनी ज़रूरत के हिसाब से कोई भी टेम्प्लेट चुनकर उसे एडिट कर सकते हैं।
स्टेप (3):-
ऊपर-बाएँ कोने में मौजूद ‘Elements’ ऑप्शन पर क्लिक करें। यह फ़ीचर आपको सीधे Canva में इमेज सर्च करने या डालने की सुविधा देता है। एक बार इमेज डालने के बाद, आप ऊपर दिए गए ‘Edit’ ऑप्शन का इस्तेमाल करके उसे एडिट कर सकते हैं। यहाँ आपके पास कई ऑप्शन होते हैं, जैसे इमेज में शैडो या आउटलाइन जोड़ना। आप मुख्य ‘Edit’ बटन के बगल वाले ऑप्शन का इस्तेमाल करके भी बदलाव कर सकते हैं। इमेज पर राइट-क्लिक करने से और भी ऑप्शन दिखते हैं। इसके अलावा, आप ऊपर दिए गए ‘Effects’ और ‘Animation’ ऑप्शन पर क्लिक करके इफेक्ट्स और एनिमेशन भी लगा सकते हैं।
स्टेप (4):-
बाईं ओर दिए गए ‘Text’ ऑप्शन पर क्लिक करें और जो चाहें वह टाइप करें। टाइप करने के बाद, टेक्स्ट के चारों ओर हैंडल दिखाई देंगे, जिनसे आप इसकी चौड़ाई को बाईं और दाईं ओर से एडजस्ट कर सकते हैं। आप ऊपर दिए गए ऑप्शन का इस्तेमाल करके फ़ॉन्ट, रंग और साइज़ बदल सकते हैं। आप पास में मौजूद ‘Edit’ ऑप्शन के ज़रिए और भी एडिटिंग फ़ीचर का इस्तेमाल कर सकते हैं—जैसे आउटलाइन या शैडो जोड़ना। साथ ही, आप ऊपर दिए गए ‘Effects’ और ‘Animation’ ऑप्शन का इस्तेमाल करके इफेक्ट्स और एनिमेशन भी लगा सकते हैं।
स्टेप (5):-
बाईं ओर दिए गए ‘Upload’ ऑप्शन पर क्लिक करके, आप अपने सिस्टम में सेव की गई या Google से डाउनलोड की गई इमेज डाल सकते हैं।
स्टेप (6):-
अलग-अलग शेप डालने के लिए बाईं ओर दिए गए ‘Tools’ ऑप्शन पर क्लिक करें। पेज पर काम पूरा होने के बाद, आप ऊपर दिए गए ‘Save’ ऑप्शन पर क्लिक करके इसे सेव कर सकते हैं; या फिर, प्रोजेक्ट अपने-आप सेव हो जाता है। इसके बाद, आप ऊपर दाईं ओर दिए गए ‘Share’ ऑप्शन पर क्लिक करके इसे डाउनलोड कर सकते हैं।
स्टेप (7):-
आप बाईं ओर दिए गए ‘Project’ ऑप्शन के तहत अपने बनाए गए सभी पेज देख पाएँगे।
Video Tutorial:- https://youtu.be/WWAi6NWcwoI