
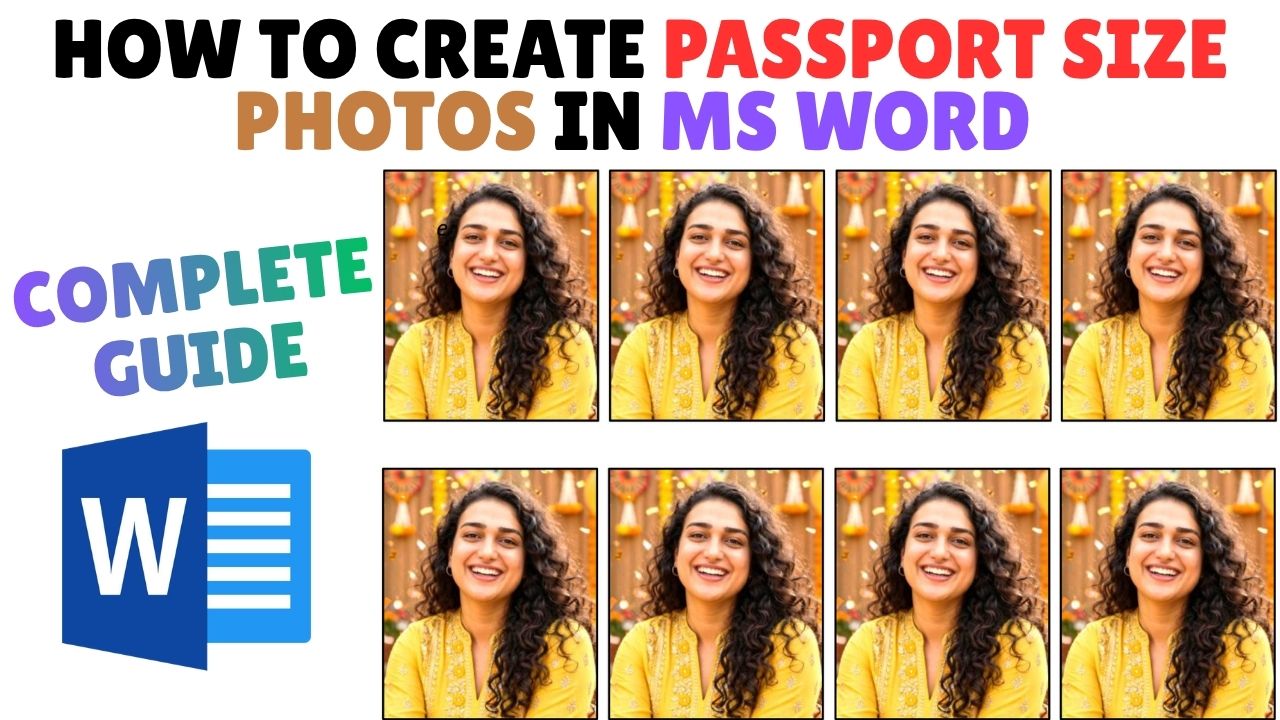
How to Create Passport Size Photo in Microsoft Word | Passport Size photo | Complete Guide
Can we create passport-size photos in MS Word? Yes, absolutely! So, let’s learn how to create passport-size photos in MS Word—here is the complete guide. Today, we will learn how to make passport-size photos using MS Word. While passport-size photos are usually created in Photoshop—because it offers more options like light correction, color correction, and precise background removal—you can also perform color corrections in MS Word, though you cannot remove the background. There are online sites that remove backgrounds, but they often lack the necessary quality and precision.
Creating passport-size photos in MS Word is a great option for those who don’t know how to use Photoshop or don’t have the software installed. To get good results in MS Word, make sure you start with a high-quality photo. Let’s get started! You can use any version of MS Word for this, though newer versions (like 2013, 2014, 2015, or the latest releases) offer more features.
We will learn the process of creating passport-size photos in five steps. Be sure to watch the video tutorial for this blog; you can view it by clicking the link provided below.
Step (1):-
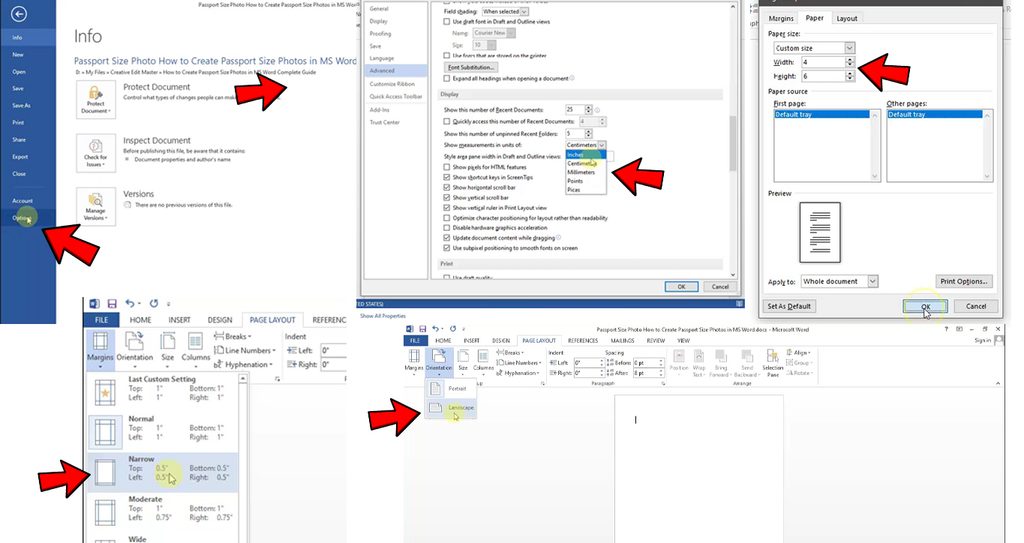
First, open MS Word and start a new blank document (or press Ctrl+N on your keyboard). Go to the “Page Layout” option in the top menu bar, click on “Size,” and then select “More Paper Sizes” at the bottom. The “Page Setup” window will open; the width and height will likely be displayed in centimeters (cm), so you will need to change them to inches.
To do this, go to the “File” option in the top-left corner, click on “Options” at the very bottom, and then select “Advanced.” Scroll down to find the “Show measurements in units of” option, select “Inches” from the list, and click “OK.” Now, go to the ‘Page Layout’ tab, click on ‘Size’, select ‘More Paper Sizes’ at the bottom, set the width to 4 inches and the height to 6 inches, and click OK. Click on the ‘Margins’ option (top left) and select ‘Narrow’. Then, click on ‘Orientation’ and select ‘Landscape’. Your page settings are now complete.
Step (2):-
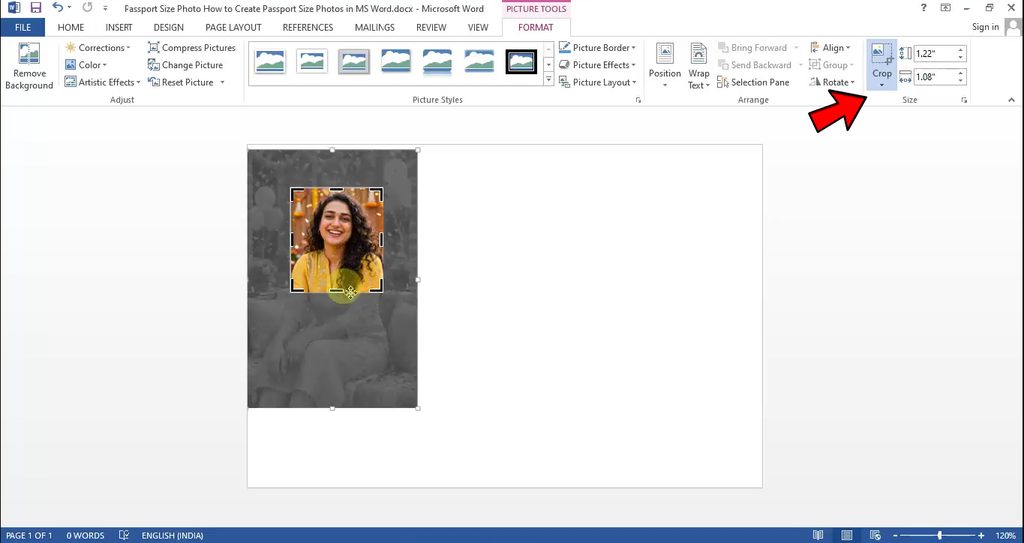
Go to the ‘Insert’ tab and click on ‘Picture’ to select a photo. To make it a passport-sized photo, you need to crop it; go to the ‘Format’ tab in the menu bar, locate the ‘Crop’ option on the right side, and crop your photo.
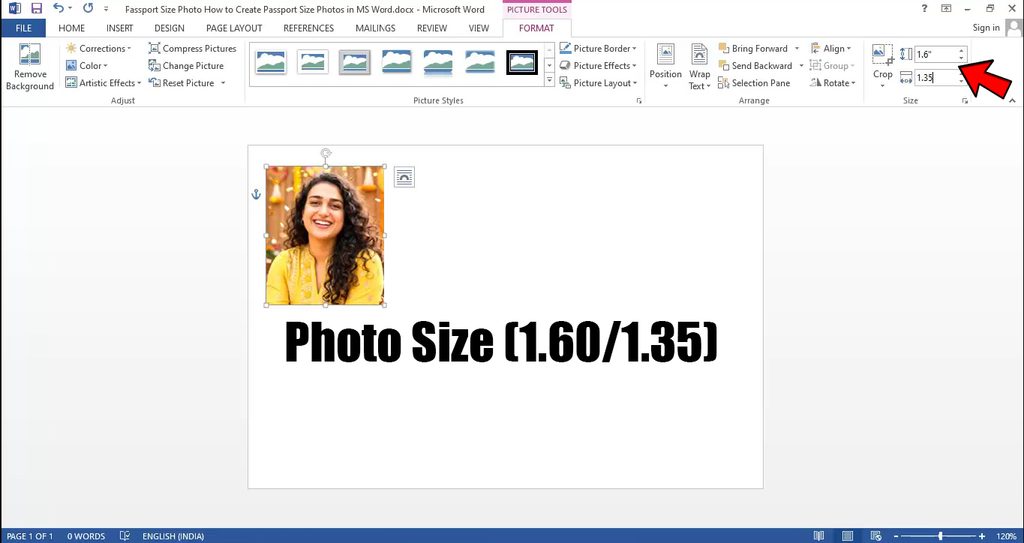
In the ‘Format’ tab, click on ‘Corrections’ (on the left) to adjust the lighting as needed, and then select the desired color settings. Also, in the ‘Format’ tab, next to the ‘Crop’ option on the right, set the dimensions—for example, set the Height to 1.60 and the Width to 1.35.
Step (3):-
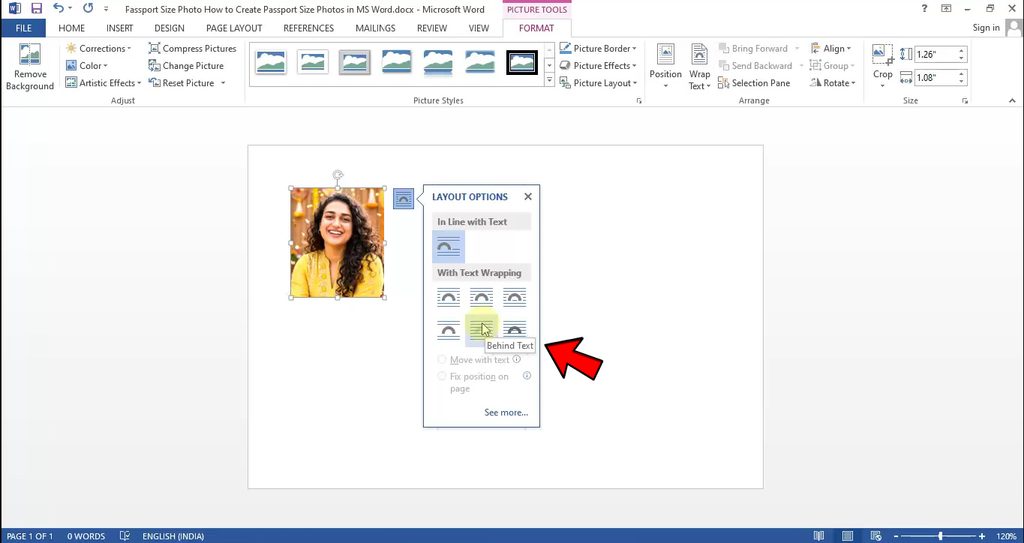
Go to the ‘Layout’ options and select ‘Behind Text’; this allows you to move the photo anywhere within the page area. To apply this setting, go to the ‘Format’ tab, click on ‘Position’, select ‘More Layout Options’, go to the ‘Text Wrapping’ tab, select ‘Behind Text’, and click OK. A small icon will also appear next to your photo indicating this setting.
Step (4):-
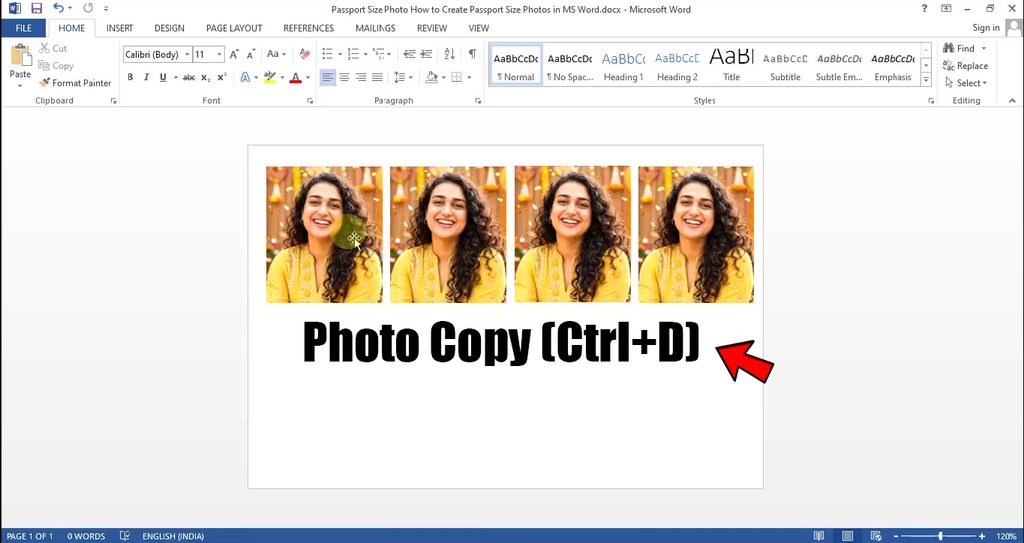
Now, adjust the photo on the page. Use ‘Ctrl + D’ to create copies of the photo. Align the four photos in a straight row on the left; go to the ‘Format’ tab, click on ‘Align’, and select ‘Middle’ to align them properly. Copy the four photos again using ‘Ctrl + D’ and position them below the first row. Finally, select all the photos, go to the ‘Format’ tab, click on ‘Picture Border’, and adjust the ‘Weight’ to add a border stroke.
Step (5):-
Your passport-sized photos are now ready to be printed. If you have a printer, you can print right at home since all the page settings are already configured; you simply need to buy some glossy paper from the market.
In Hindi:-
क्या हम MS Word में पासपोर्ट-साइज़ फ़ोटो बना सकते हैं? हाँ, बिल्कुल! तो आइए जानते हैं कि MS Word में पासपोर्ट-साइज़ फ़ोटो कैसे बनाएँ—यहाँ पूरी गाइड दी गई है। आज हम MS Word का इस्तेमाल करके पासपोर्ट-साइज़ फ़ोटो बनाना सीखेंगे। वैसे तो पासपोर्ट-साइज़ फ़ोटो आमतौर पर Photoshop में बनाए जाते हैं—क्योंकि इसमें लाइट करेक्शन, कलर करेक्शन और बैकग्राउंड को ठीक से हटाने जैसे ज़्यादा विकल्प मिलते हैं—लेकिन आप MS Word में भी कलर करेक्शन कर सकते हैं, हालाँकि आप बैकग्राउंड नहीं हटा सकते। ऐसी ऑनलाइन साइटें हैं जो बैकग्राउंड हटा देती हैं, लेकिन उनमें अक्सर ज़रूरी क्वालिटी और सटीकता की कमी होती है।
MS Word में पासपोर्ट-साइज़ फ़ोटो बनाना उन लोगों के लिए एक बढ़िया विकल्प है जिन्हें Photoshop इस्तेमाल करना नहीं आता या जिनके पास यह सॉफ़्टवेयर इंस्टॉल नहीं है। MS Word में अच्छे नतीजे पाने के लिए, पक्का करें कि आप एक अच्छी क्वालिटी वाली फ़ोटो से शुरुआत करें। आइए शुरू करते हैं! इसके लिए आप MS Word के किसी भी वर्शन का इस्तेमाल कर सकते हैं, हालाँकि नए वर्शन (जैसे 2013, 2014, 2015 या लेटेस्ट रिलीज़) में ज़्यादा फ़ीचर मिलते हैं।
हम पासपोर्ट-साइज़ फ़ोटो बनाने की प्रक्रिया पाँच स्टेप्स में सीखेंगे। इस ब्लॉग के लिए वीडियो ट्यूटोरियल ज़रूर देखें; आप नीचे दिए गए लिंक पर क्लिक करके इसे देख सकते हैं।
स्टेप (1):-
सबसे पहले, MS Word खोलें और एक नया खाली डॉक्यूमेंट शुरू करें (या अपने कीबोर्ड पर Ctrl+N दबाएँ)। ऊपर मेनू बार में “Page Layout” विकल्प पर जाएँ, “Size” पर क्लिक करें, और फिर नीचे “More Paper Sizes” चुनें। “Page Setup” विंडो खुलेगी; चौड़ाई और ऊँचाई शायद सेंटीमीटर (cm) में दिखाई देगी, इसलिए आपको उन्हें इंच में बदलना होगा।
ऐसा करने के लिए, ऊपर-बाएँ कोने में “File” विकल्प पर जाएँ, सबसे नीचे “Options” पर क्लिक करें, और फिर “Advanced” चुनें। नीचे स्क्रॉल करके “Show measurements in units of” विकल्प ढूँढें, लिस्ट से “Inches” चुनें और “OK” पर क्लिक करें। अब, ‘Page Layout’ टैब पर जाएँ, ‘Size’ पर क्लिक करें, नीचे ‘More Paper Sizes’ चुनें, चौड़ाई को 4 इंच और ऊँचाई को 6 इंच पर सेट करें और OK पर क्लिक करें। ‘Margins’ ऑप्शन (ऊपर बाईं ओर) पर क्लिक करें और ‘Narrow’ चुनें। फिर, ‘Orientation’ पर क्लिक करें और ‘Landscape’ चुनें। अब आपके पेज की सेटिंग्स पूरी हो गई हैं।
स्टेप (2):-
‘Insert’ टैब पर जाएं और फोटो चुनने के लिए ‘Picture’ पर क्लिक करें। इसे पासपोर्ट-साइज़ फोटो बनाने के लिए, आपको इसे क्रॉप करना होगा; मेनू बार में ‘Format’ टैब पर जाएं, दाईं ओर ‘Crop’ ऑप्शन ढूंढें और अपनी फोटो को क्रॉप करें।
‘Format’ टैब में, ज़रूरत के हिसाब से लाइटिंग एडजस्ट करने के लिए ‘Corrections’ (बाईं ओर) पर क्लिक करें, और फिर मनचाही कलर सेटिंग्स चुनें। साथ ही, ‘Format’ टैब में, दाईं ओर ‘Crop’ ऑप्शन के बगल में डाइमेंशन सेट करें—उदाहरण के लिए, Height को 1.60 और Width को 1.35 पर सेट करें।
स्टेप (3):-
‘Layout’ ऑप्शन पर जाएं और ‘Behind Text’ चुनें; इससे आप फोटो को पेज एरिया में कहीं भी ले जा सकते हैं। इस सेटिंग को लागू करने के लिए, ‘Format’ टैब पर जाएं, ‘Position’ पर क्लिक करें, ‘More Layout Options’ चुनें, ‘Text Wrapping’ टैब पर जाएं, ‘Behind Text’ चुनें और OK पर क्लिक करें। आपकी फोटो के बगल में एक छोटा आइकन भी दिखाई देगा जो इस सेटिंग को दिखाएगा।
स्टेप (4):-
अब, पेज पर फोटो को एडजस्ट करें। फोटो की कॉपी बनाने के लिए ‘Ctrl + D’ का इस्तेमाल करें। बाईं ओर एक सीधी लाइन में चार फोटो लगाएं; ‘Format’ टैब पर जाएं, ‘Align’ पर क्लिक करें और उन्हें ठीक से अलाइन करने के लिए ‘Middle’ चुनें। ‘Ctrl + D’ का इस्तेमाल करके फिर से चार फोटो कॉपी करें और उन्हें पहली लाइन के नीचे रखें। आखिर में, सभी फोटो चुनें, ‘Format’ टैब पर जाएं, ‘Picture Border’ पर क्लिक करें और बॉर्डर स्ट्रोक जोड़ने के लिए ‘Weight’ को एडजस्ट करें।
स्टेप (5):-
अब आपकी पासपोर्ट-साइज़ फोटो प्रिंट होने के लिए तैयार हैं। अगर आपके पास प्रिंटर है, तो आप घर पर ही प्रिंट कर सकते हैं क्योंकि पेज की सभी सेटिंग्स पहले से ही सेट हैं; आपको बस बाज़ार से कुछ ग्लॉसी पेपर खरीदने होंगे।