
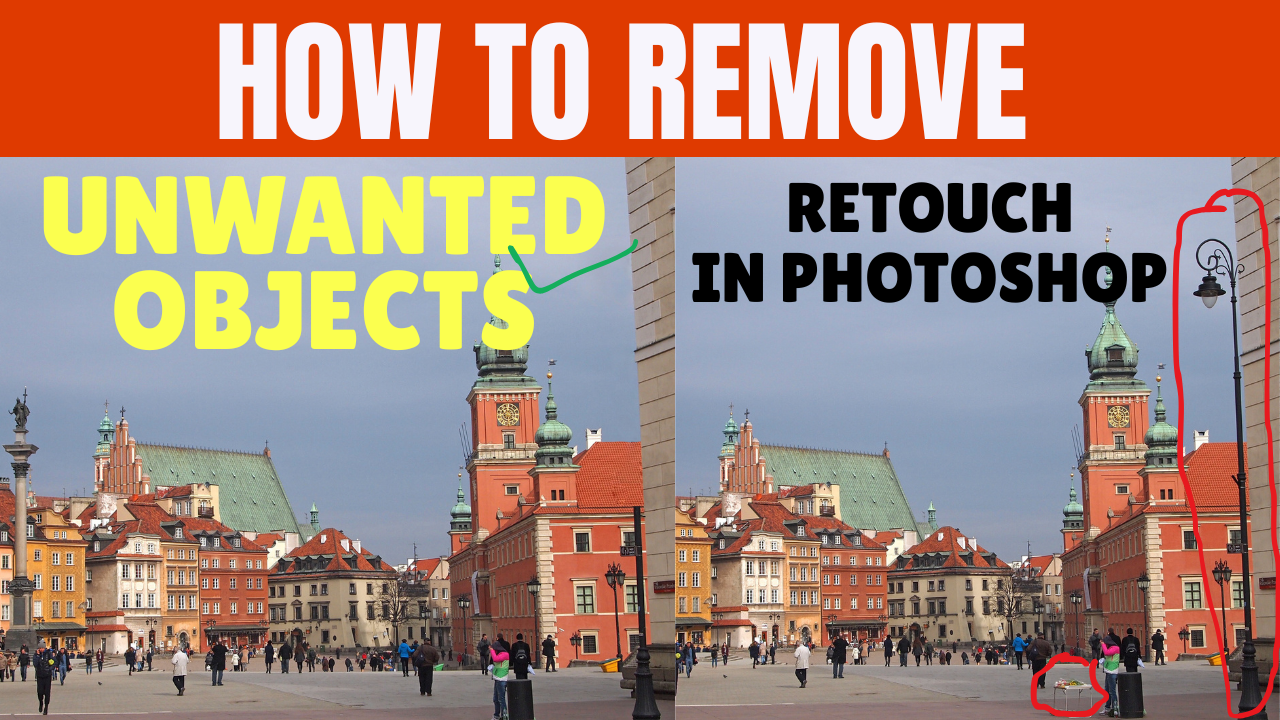
Friends, in today’s blog, we will learn how to remove unwanted areas—or retouch—using Photoshop. We will learn how to select and remove these unwanted sections using specific Photoshop tools. We will achieve this effectively using three powerful tools capable of easily removing any unwanted area: the Patch Tool, the Clone Stamp Tool, and the ‘Fill’ function (accessed by pressing Shift+F5). While removal is possible via other software or mobile apps, Photoshop allows for a perfect finish. This process works exceptionally well in newer versions of Photoshop, such as 2019, 2020, 2021, 2022, 2023, or the latest release. So, let’s learn how to do this in five steps.
We will cover this process in five steps. After reading this blog, be sure to watch the video tutorial; you can find the link at the bottom of the page.
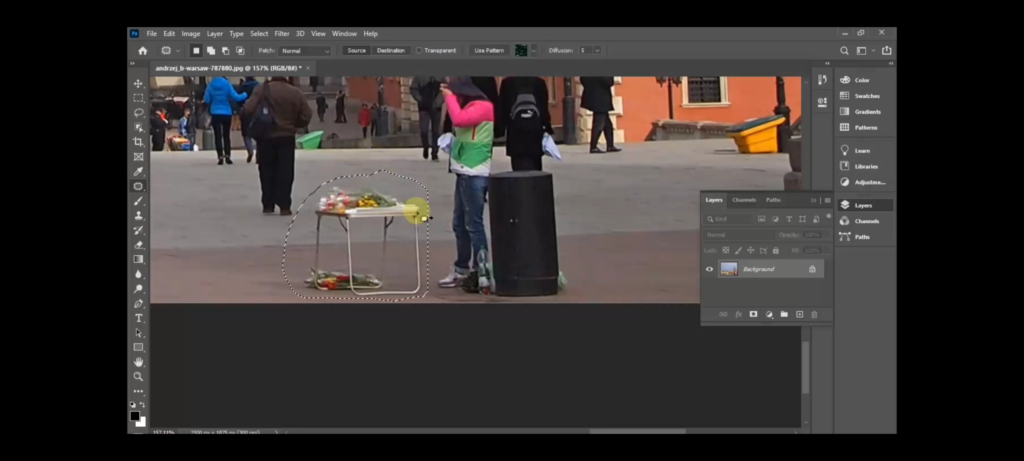
Step (1):-
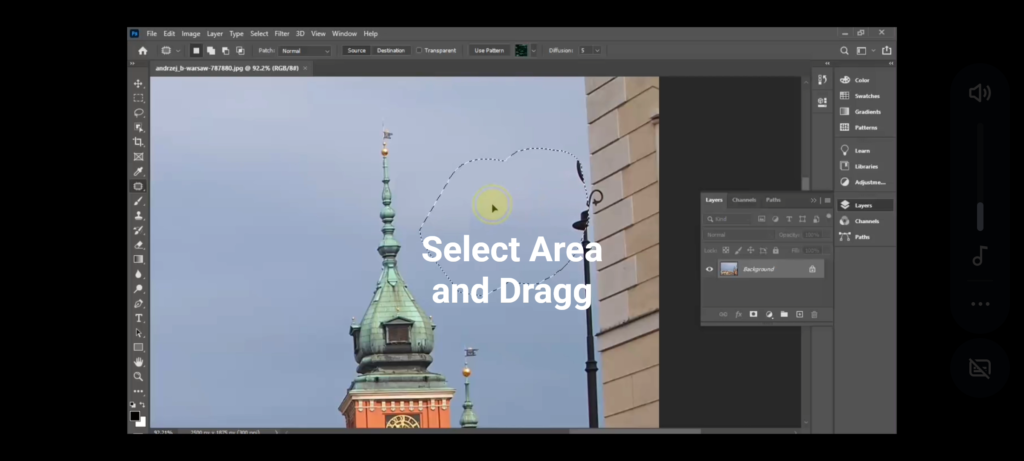
Open Photoshop and insert an image using the Ctrl+O shortcut. Choose an image that contains an unwanted area. Locate the toolbar on the left side, right-click on the tool icon displaying an arrow, and select the first option: the Patch Tool.
Step (2):-
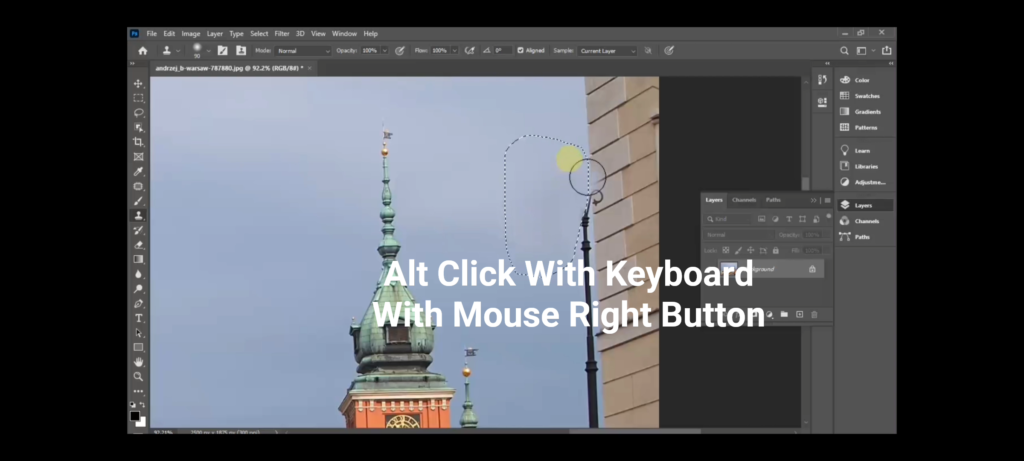
Use the Patch Tool to select the unwanted area. Then, drag the selected area onto the surrounding background to blend it in. If any traces of the unwanted area remain, use the Clone Stamp Tool (activate it by pressing ‘S’ on your keyboard). To use it, hold down the ‘Alt’ key while simultaneously right-clicking with your mouse on the background area you wish to sample (blend with), and then apply it to remove the remaining unwanted area.
Step (3):-
For the next tool, click the same arrow button in the toolbar on the left and select the Clone Stamp Tool. Now, use this tool to remove the unwanted area; to do this, press and hold the ‘Alt’ key on your keyboard while simultaneously right-clicking with your mouse on the background area you wish to use for covering the unwanted section.
Step (4):-
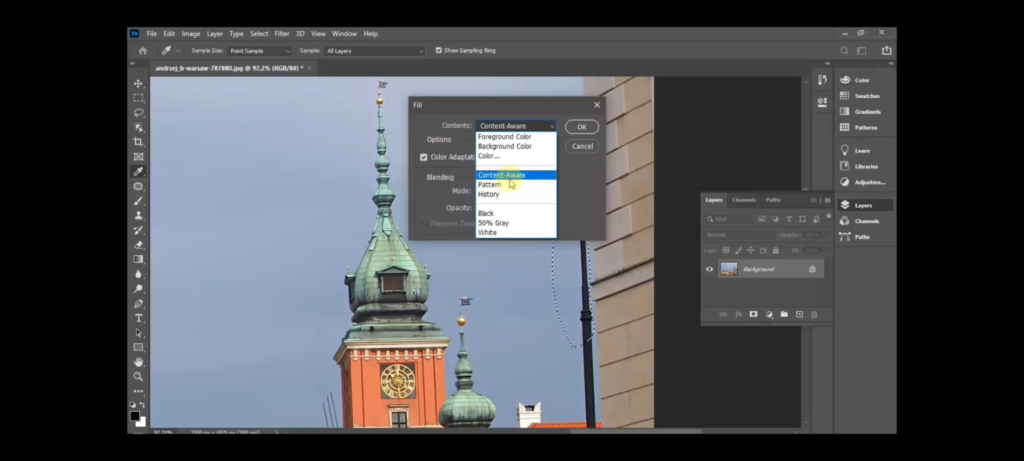
The third tool is more powerful than the previous two; it quickly removes unwanted areas after a selection is made. However, it works best on areas that aren’t overly complex or cluttered; if the unwanted area is extensive or complex, you may need to use a combination of these three tools to remove it effectively. To use this tool, press ‘Shift + F5’ on your keyboard to open the ‘Fill’ dialog box. Within this box, locate the ‘Contents’ setting, select ‘Content-Aware’ from the options, and click ‘OK’.
Step (5):-
By using these three tools with precision and attention to detail, you can remove unwanted areas flawlessly. To learn how to do this, please click the video link provided below this post.
In Hindi:-
दोस्तों, आज के ब्लॉग में हम सीखेंगे कि फ़ोटोशॉप का इस्तेमाल करके अनचाहे हिस्सों को कैसे हटाएं—यानी रीटचिंग कैसे करें। हम फ़ोटोशॉप के खास टूल्स का इस्तेमाल करके इन अनचाहे हिस्सों को चुनना और हटाना सीखेंगे। हम इसे तीन दमदार टूल्स की मदद से आसानी से कर सकते हैं, जो किसी भी अनचाहे हिस्से को हटाने में सक्षम हैं: पैच टूल, क्लोन स्टैम्प टूल और ‘फिल’ फ़ंक्शन (जिसे Shift+F5 दबाकर इस्तेमाल किया जा सकता है)। हालांकि दूसरे सॉफ़्टवेयर या मोबाइल ऐप्स से भी ऐसा किया जा सकता है, लेकिन फ़ोटोशॉप से एकदम बढ़िया फ़िनिश मिलती है। यह प्रोसेस फ़ोटोशॉप के नए वर्शन जैसे 2019, 2020, 2021, 2022, 2023 या लेटेस्ट रिलीज़ में बहुत अच्छे से काम करता है। तो आइए, इसे पाँच स्टेप्स में करना सीखते हैं।
हम इस प्रोसेस को पाँच स्टेप्स में पूरा करेंगे। इस ब्लॉग को पढ़ने के बाद, वीडियो ट्यूटोरियल ज़रूर देखें; इसका लिंक पेज के नीचे दिया गया है।
स्टेप (1):-
फ़ोटोशॉप खोलें और Ctrl+O शॉर्टकट का इस्तेमाल करके कोई इमेज डालें। ऐसी इमेज चुनें जिसमें कोई अनचाहा हिस्सा हो। बाईं ओर टूलबार देखें, तीर (arrow) वाले टूल आइकन पर राइट-क्लिक करें और पहला ऑप्शन चुनें: पैच टूल।
स्टेप (2):-
अनचाहे हिस्से को चुनने के लिए पैच टूल का इस्तेमाल करें। फिर, चुने हुए हिस्से को आस-पास के बैकग्राउंड पर खींचें (ड्रैग करें) ताकि वह उसमें मिल जाए। अगर अनचाहे हिस्से का कोई निशान रह जाता है, तो क्लोन स्टैम्प टूल का इस्तेमाल करें (इसे कीबोर्ड पर ‘S’ दबाकर एक्टिवेट करें)। इसे इस्तेमाल करने के लिए, ‘Alt’ की (key) को दबाकर रखें और साथ ही उस बैकग्राउंड एरिया पर माउस से राइट-क्लिक करें जिसका आप सैंपल लेना चाहते हैं (यानी जिससे मिलाना चाहते हैं), और फिर बचे हुए अनचाहे हिस्से को हटाने के लिए इसे अप्लाई करें।
स्टेप (3):-
अगले टूल के लिए, बाईं ओर टूलबार में उसी तीर वाले बटन पर क्लिक करें और क्लोन स्टैम्प टूल चुनें। अब, इस टूल का इस्तेमाल करके अनचाहे हिस्से को हटाएं; ऐसा करने के लिए, कीबोर्ड पर ‘Alt’ की को दबाकर रखें और साथ ही उस बैकग्राउंड एरिया पर माउस से राइट-क्लिक करें जिसका इस्तेमाल आप अनचाहे हिस्से को ढकने के लिए करना चाहते हैं।
स्टेप (4):-
तीसरा टूल पिछले दो टूल्स से ज़्यादा दमदार है; यह सिलेक्शन करने के बाद अनचाहे हिस्सों को तेज़ी से हटा देता है। हालांकि, यह उन जगहों पर सबसे अच्छा काम करता है जो बहुत ज़्यादा जटिल या अव्यवस्थित नहीं हैं; अगर हटाने वाला हिस्सा बड़ा या जटिल है, तो उसे ठीक से हटाने के लिए आपको इन तीनों टूल्स का एक साथ इस्तेमाल करना पड़ सकता है। इस टूल का इस्तेमाल करने के लिए, कीबोर्ड पर ‘Shift + F5’ दबाकर ‘Fill’ डायलॉग बॉक्स खोलें। इस बॉक्स में, ‘Contents’ सेटिंग ढूंढें, विकल्पों में से ‘Content-Aware’ चुनें और ‘OK’ पर क्लिक करें।
स्टेप (5):-
इन तीनों टूल्स का बारीकी और ध्यान से इस्तेमाल करके, आप बिना किसी कमी के अनचाहे हिस्सों को हटा सकते हैं। यह कैसे करना है, यह जानने के लिए कृपया इस पोस्ट के नीचे दिए गए वीडियो लिंक पर क्लिक करें।
Video Tutorial:- https://youtu.be/OfUBgEiQYRY