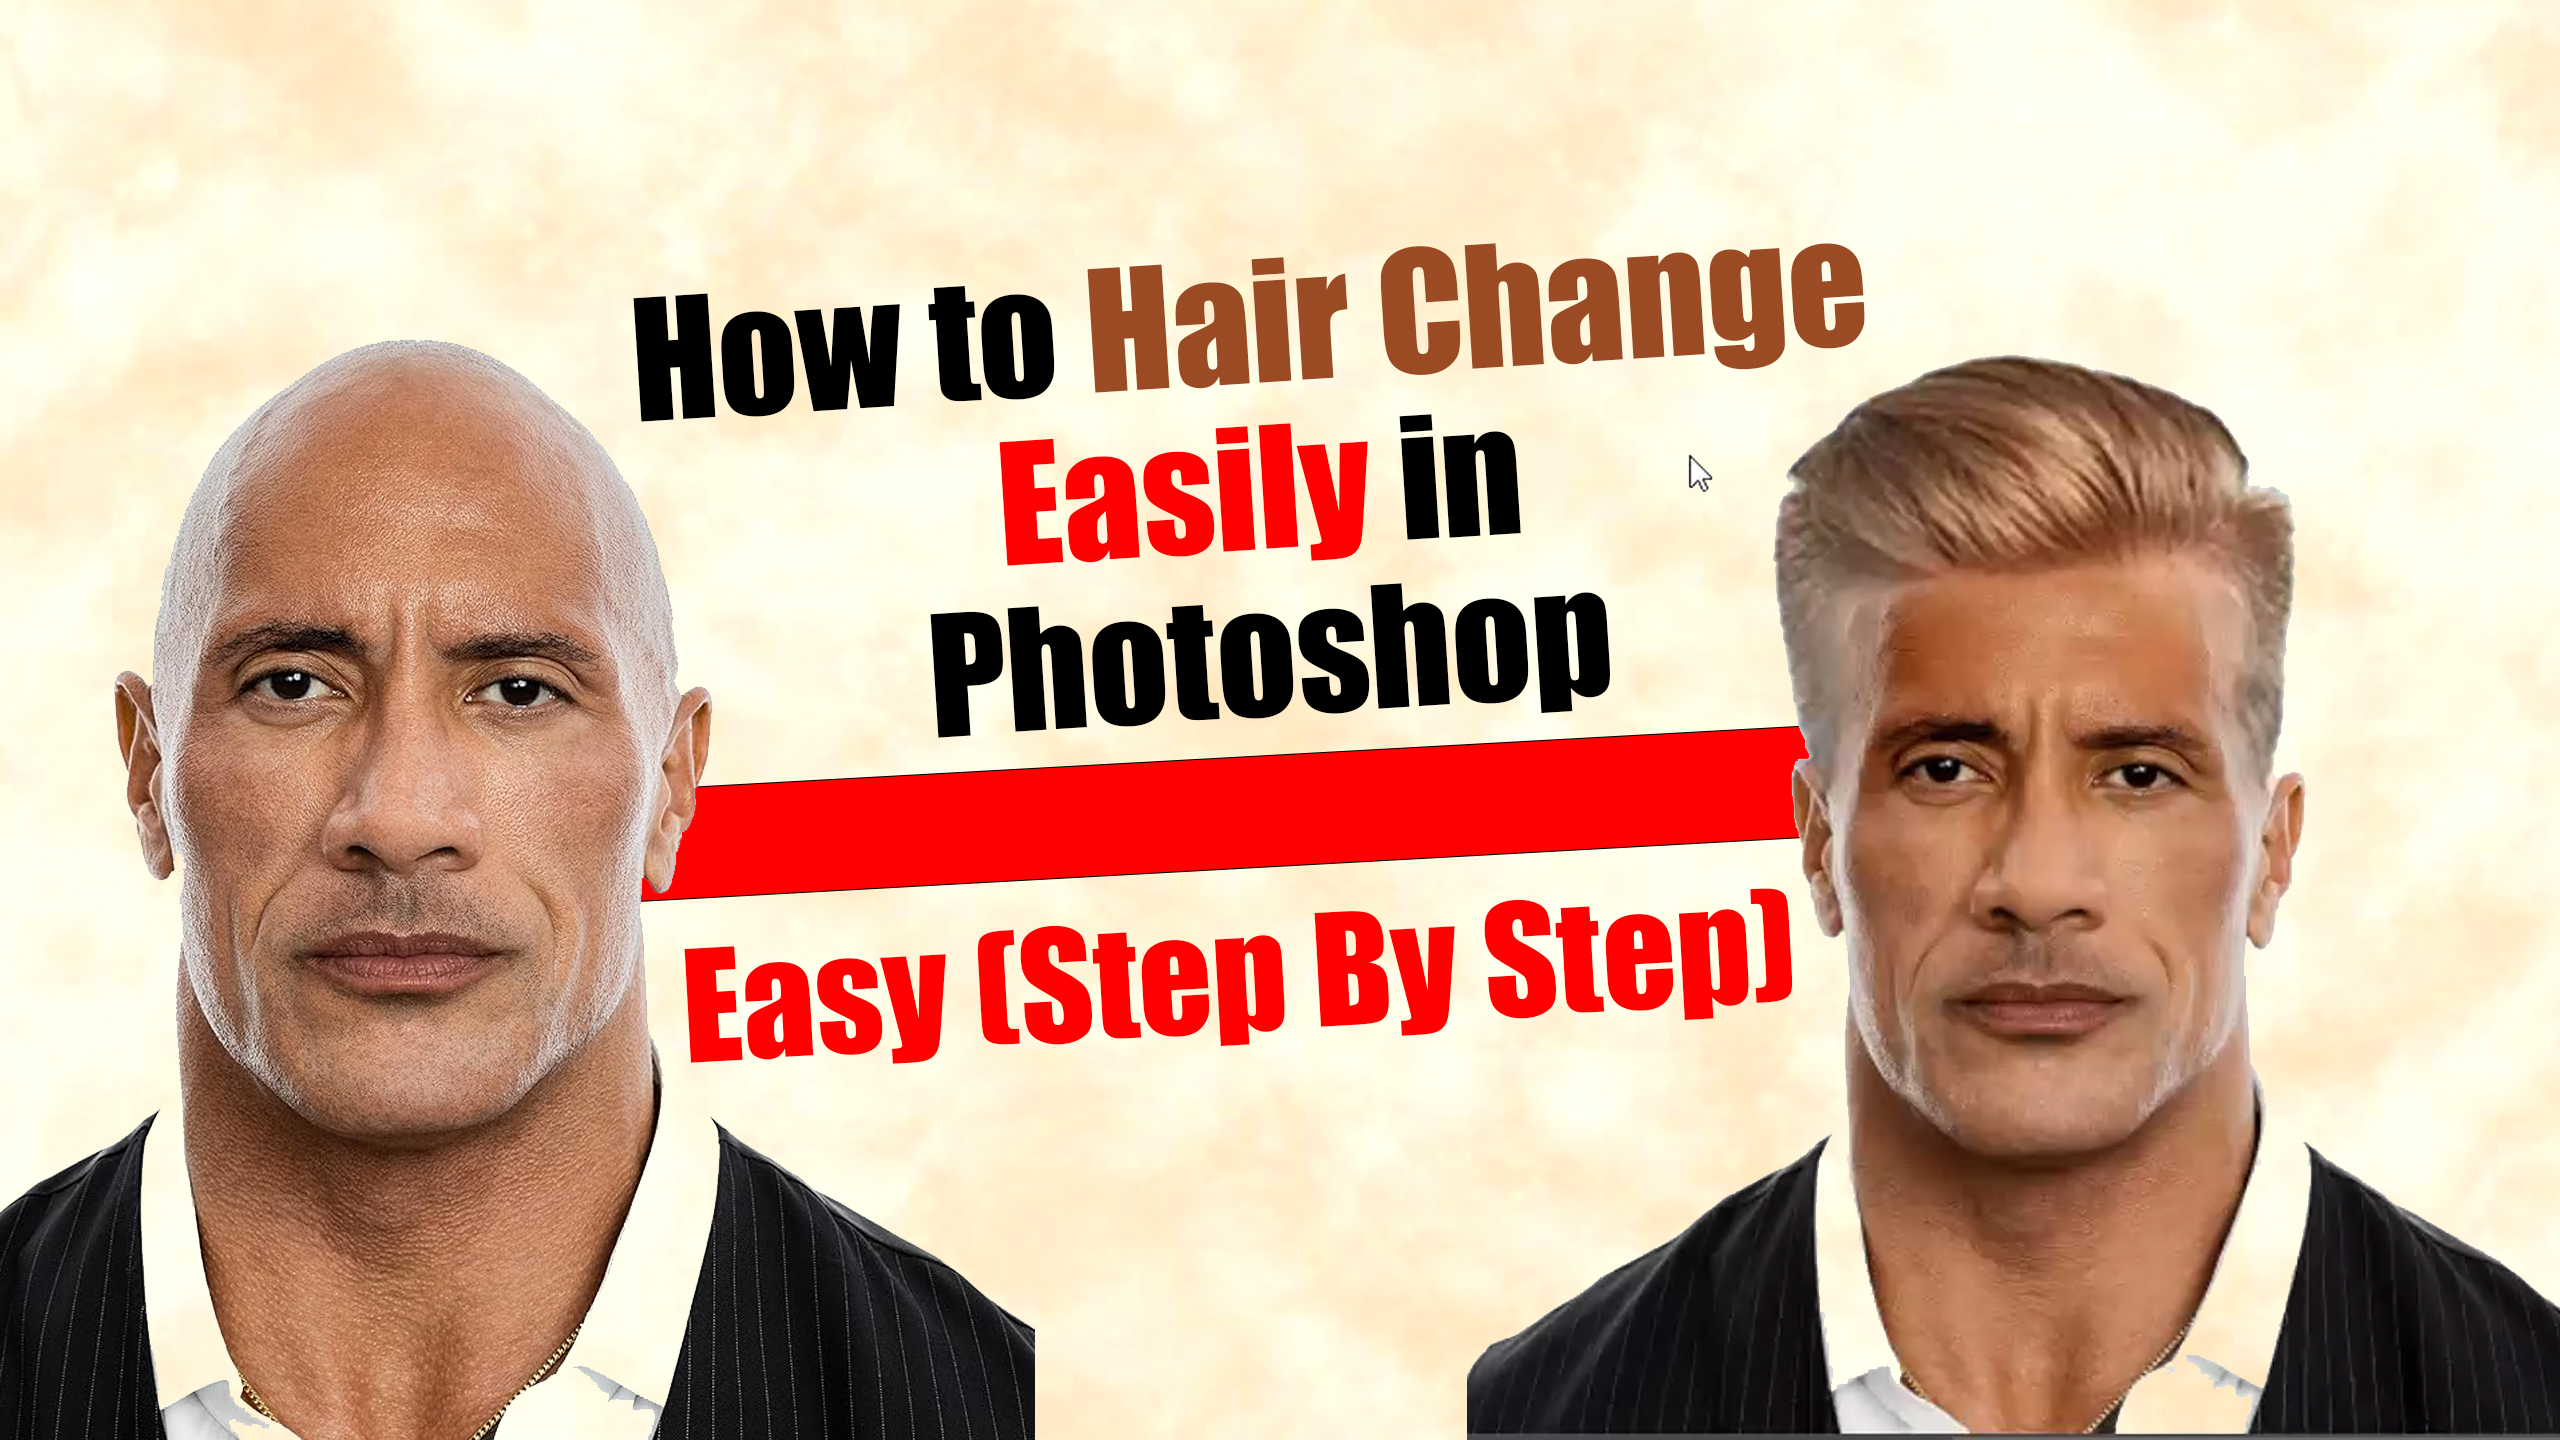
Friends, in today’s blog post, we will learn how to change a person’s hairstyle. We will accomplish this with great ease and absolute perfection—so seamlessly, in fact, that it will be completely undetectable. To do this, we will utilize Adobe Photoshop software. It is highly recommended that you work with a newer version of Photoshop (such as versions 19, 20, 23, or any subsequent latest releases), as the software performs more efficiently and produces superior graphics in these modern iterations. So, let’s get started and learn this process through four simple steps.
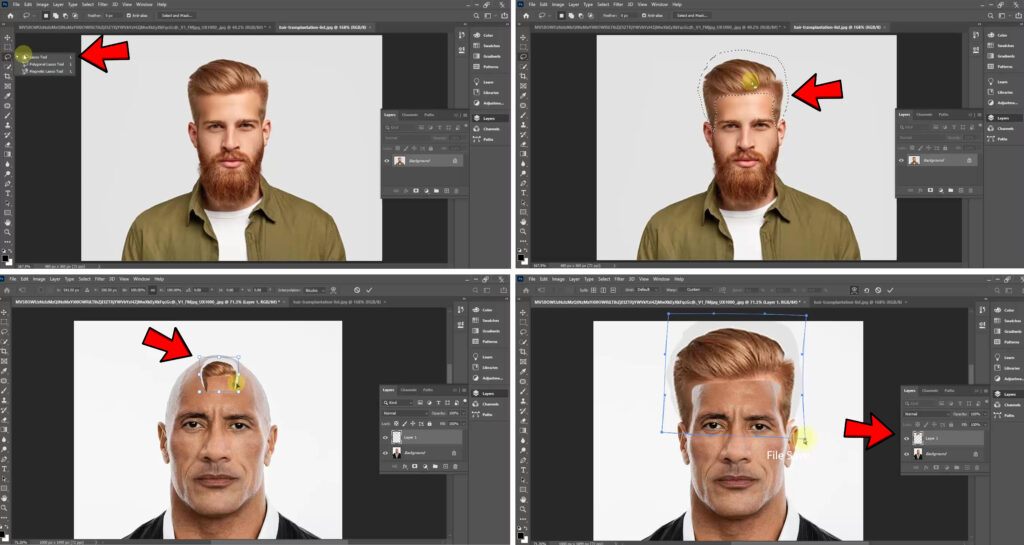
Step (1):-
Download a photograph of a person from the internet—specifically one featuring a good head of hair. Next, open this image in Photoshop. Using the Lasso Tool, carefully select the hair from that image.
Step (2):-
Copy the selected hair and paste it onto the new layer containing the subject whose hair you wish to change. Use the keyboard shortcut Ctrl+T to resize and position the hair appropriately. Then, right-click on the hair layer and select the “Warp” option to fine-tune the edges and contours, ensuring they blend naturally with the surrounding areas.
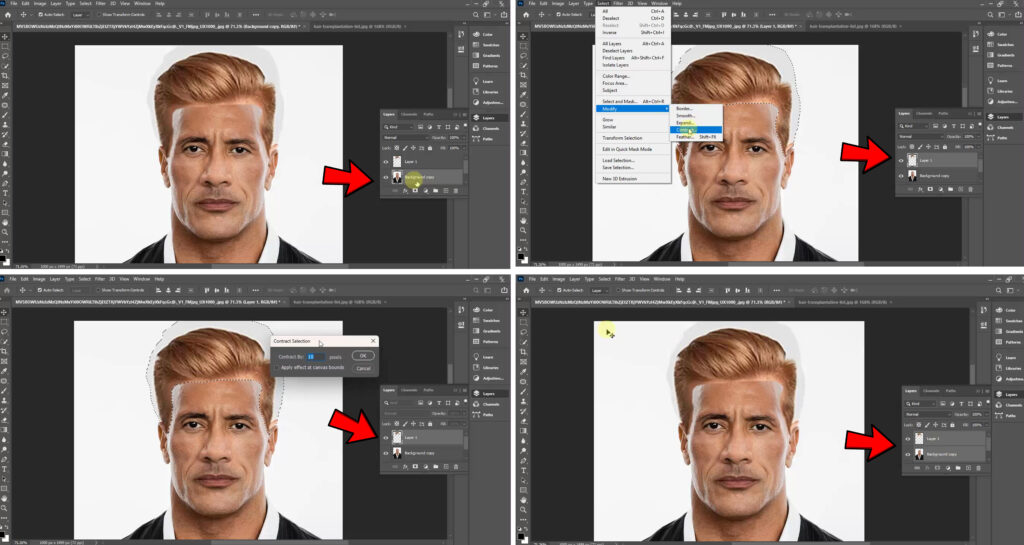
Step (3):-
Create a duplicate copy of the layer containing the subject onto whom you are applying the hair. Now, while holding down the Ctrl key, click on the hair layer to create a selection. Next, navigate to the top menu bar, go to the “Select” menu, choose “Modify,” and click on the “Contract” option. Enter a value that suits your specific image (adjusting it as needed) and click “OK.”
Step (4):-
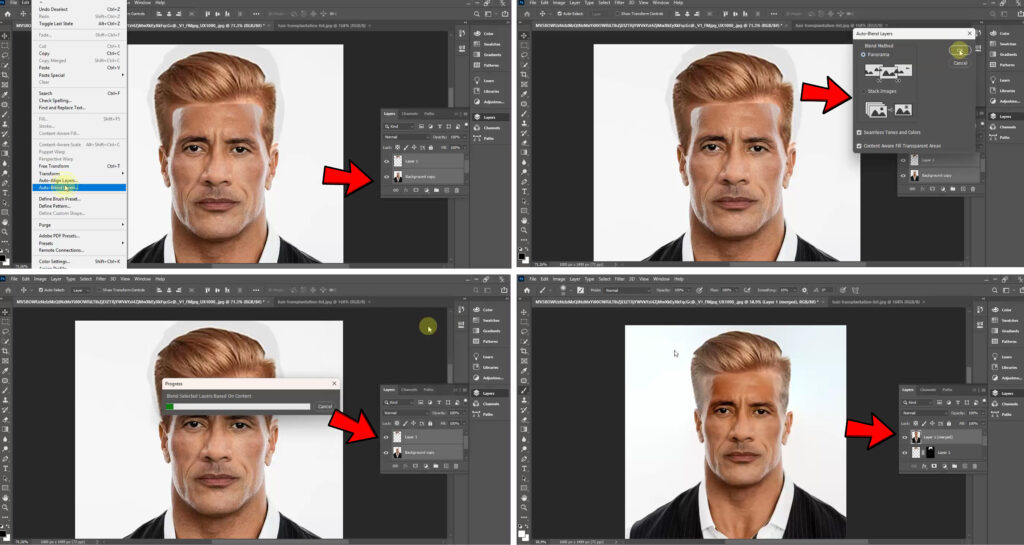
Now, select both the hair layer and the main subject layer simultaneously. Go to the “Edit” menu in the top menu bar and select the “Auto-Blend Layers” option located at the bottom of the menu. A dialog box will appear; ensure that the “Panorama” option is selected, check the two options listed below it, and click “OK.” Wait a moment for the process to complete; you now have a perfectly blended layer featuring the new hairstyle!.
You can also watch a video tutorial accompanying this blog post by clicking on the link provided below.
In Hindi
दोस्तों, आज के ब्लॉग पोस्ट में हम सीखेंगे कि किसी व्यक्ति का हेयरस्टाइल कैसे बदला जाता है। हम यह काम बहुत आसानी से और पूरी परफेक्शन के साथ करेंगे—इतनी सफाई से कि किसी को पता भी नहीं चलेगा। ऐसा करने के लिए, हम Adobe Photoshop सॉफ्टवेयर का इस्तेमाल करेंगे। यह ज़ोरदार सलाह दी जाती है कि आप Photoshop के नए वर्शन (जैसे 19, 20, 23, या इसके बाद के कोई भी लेटेस्ट वर्शन) पर काम करें, क्योंकि इन नए वर्शन में सॉफ्टवेयर ज़्यादा अच्छे से काम करता है और बेहतर ग्राफ़िक्स बनाता है। तो चलिए, शुरू करते हैं और चार आसान स्टेप्स में यह प्रोसेस सीखते हैं।
स्टेप (1):-
इंटरनेट से किसी व्यक्ति की एक फ़ोटो डाउनलोड करें—खास तौर पर ऐसी फ़ोटो जिसमें उसके सिर पर अच्छे बाल हों। इसके बाद, इस इमेज को Photoshop में खोलें। Lasso Tool का इस्तेमाल करके, उस इमेज से बालों को सावधानी से चुनें।
स्टेप (2):-
चुने हुए बालों को कॉपी करें और उसे उस नई लेयर पर पेस्ट करें जिसमें वह व्यक्ति है जिसके बाल आप बदलना चाहते हैं। बालों का साइज़ बदलने और उन्हें सही जगह पर सेट करने के लिए कीबोर्ड शॉर्टकट Ctrl+T का इस्तेमाल करें। फिर, बालों वाली लेयर पर राइट-क्लिक करें और “Warp” ऑप्शन चुनें ताकि किनारों और बनावट को ठीक किया जा सके, और यह पक्का हो सके कि वे आस-पास के हिस्सों के साथ नैचुरली मिल जाएँ।
स्टेप (3):-
उस लेयर की एक डुप्लीकेट कॉपी बनाएँ जिसमें वह व्यक्ति है जिस पर आप बाल लगा रहे हैं। अब, Ctrl की दबाए रखते हुए, बालों वाली लेयर पर क्लिक करें ताकि एक सिलेक्शन बन जाए। इसके बाद, ऊपर के मेन्यू बार में जाएँ, “Select” मेन्यू में जाएँ, “Modify” चुनें, और “Contract” ऑप्शन पर क्लिक करें। अपनी इमेज के हिसाब से कोई वैल्यू डालें (ज़रूरत के हिसाब से इसे एडजस्ट करें) और “OK” पर क्लिक करें।
स्टेप (4):-
अब, बालों वाली लेयर और मुख्य व्यक्ति वाली लेयर, दोनों को एक साथ चुनें। ऊपर के मेन्यू बार में “Edit” मेन्यू में जाएँ और मेन्यू के नीचे दिया गया “Auto-Blend Layers” ऑप्शन चुनें। एक डायलॉग बॉक्स खुलेगा; पक्का करें कि “Panorama” ऑप्शन चुना हुआ हो, उसके नीचे दिए गए दो ऑप्शन पर टिक करें, और “OK” पर क्लिक करें। प्रोसेस पूरा होने के लिए थोड़ी देर इंतज़ार करें; अब आपके पास एक पूरी तरह से मिली-जुली लेयर है जिसमें नया हेयरस्टाइल है! आप इस ब्लॉग पोस्ट के साथ दिया गया वीडियो ट्यूटोरियल भी नीचे दिए गए लिंक पर क्लिक करके देख सकते हैं।
Video Tutorial:– https://youtu.be/cZBVr4EUyN4?si=k1AhEIgBa16sHmgW