
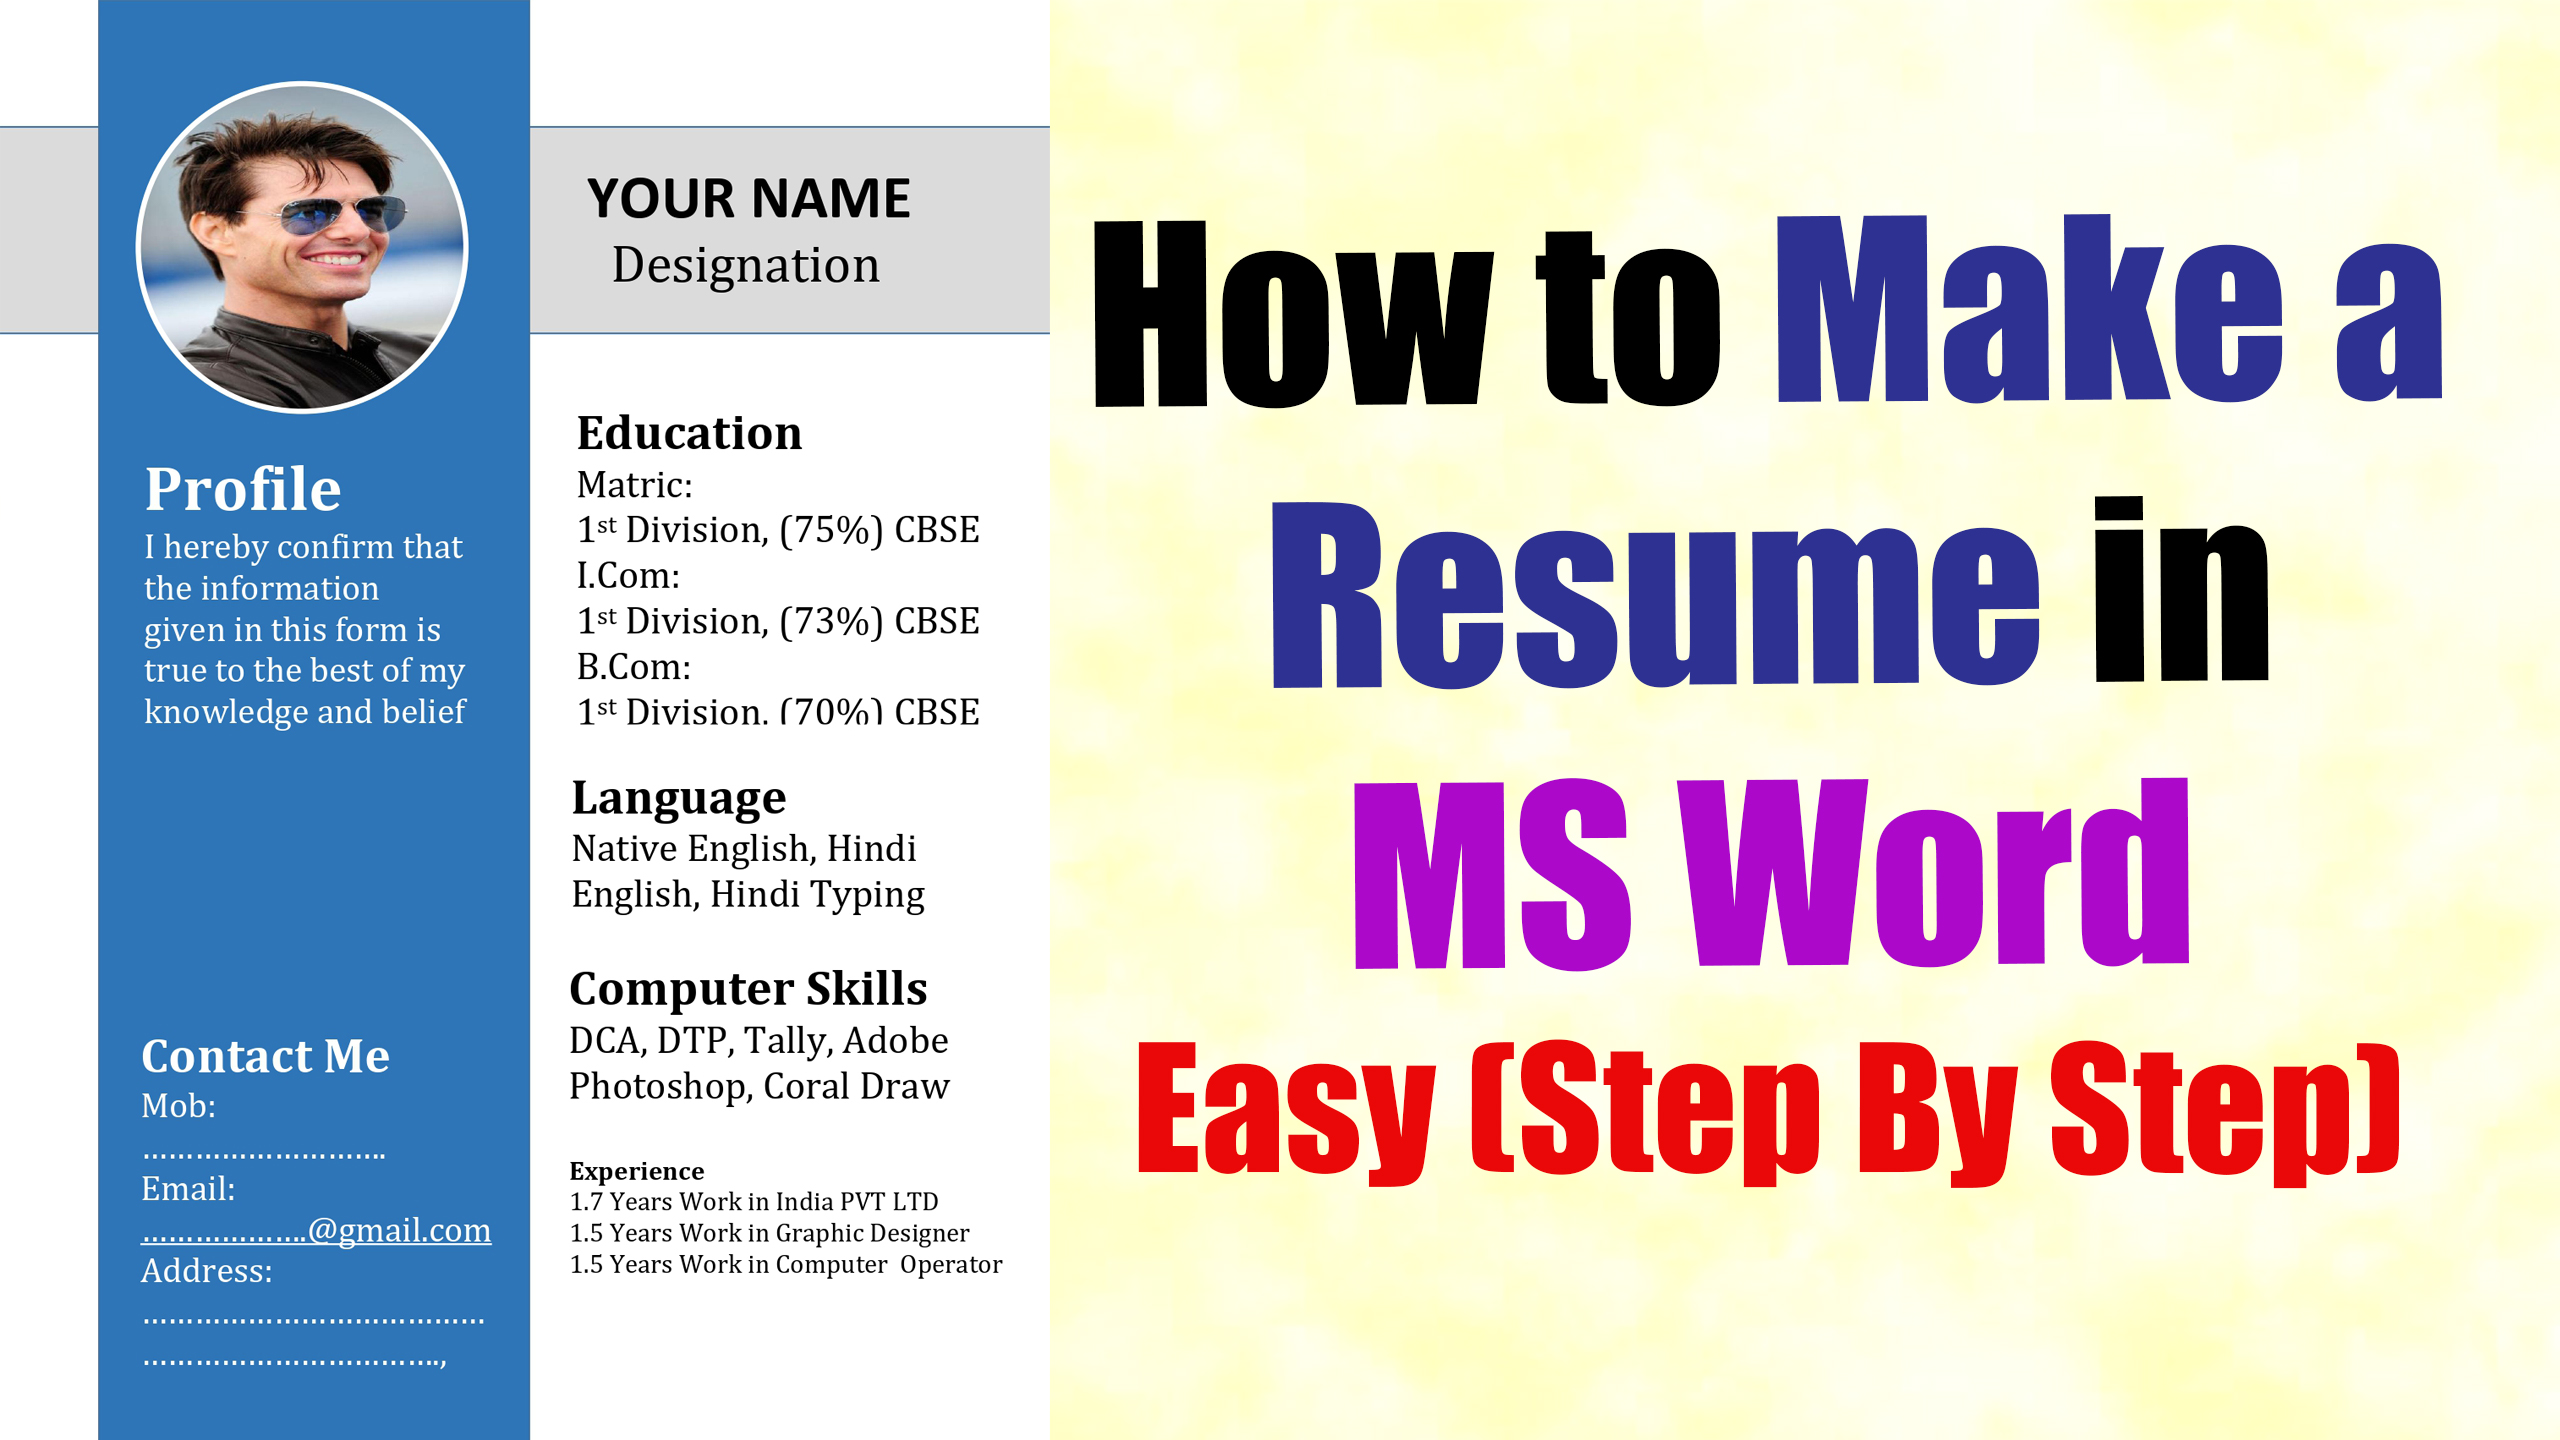
Friends, in today’s blog, we will learn how to create a resume in MS Word. While there are many software options and online tools available for creating resumes, today we will focus on creating one using MS Word. MS Word allows for extensive customization—similar to specialized design software—enabling you to create shapes and curved designs, insert images, apply gradient colors, and much more. You can design various items in MS Word, such as resumes, bio-data sheets, cover pages, flex banners, visiting cards, brochures, and invitation cards, all with great ease and precision. We will learn the process in such a way that it feels simple and straightforward. We will be using the MS Word software for this; while you can use any version, newer versions (like 2013, 2014, 2015, and the latest releases) offer a wider range of options.
We will cover this process in three steps. After reading this blog, be sure to watch the accompanying video tutorial; you can find the link at the bottom of the page.
Step (1):-
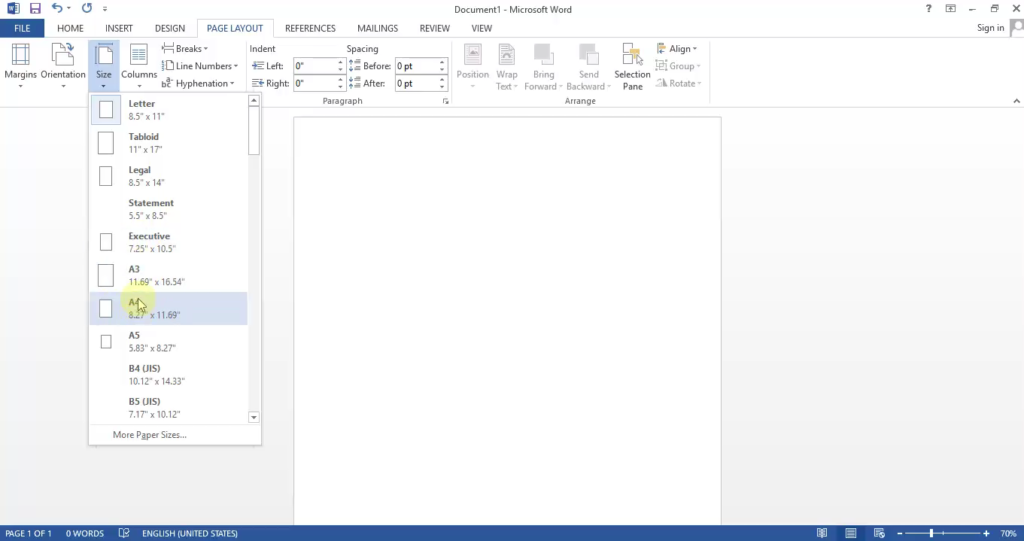
Open MS Word. Go to the ‘Page Layout’ tab on the top menu bar, select ‘Size’ on the left, and choose ‘A4’. Next, go to the ‘Insert’ tab, select ‘Shapes’, and choose a shape. Stretch the shape vertically on the left side, then create a copy of it and stretch that copy horizontally. Finally, select a round shape to serve as the placeholder for the photograph.
Step (2):-
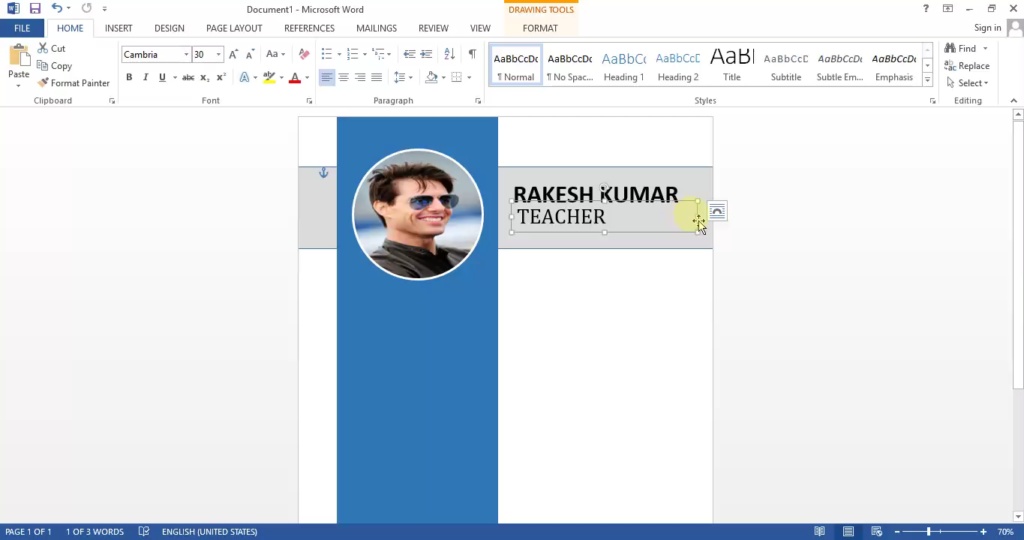
Now, go to the ‘Insert’ tab on the top menu bar and click on ‘Text Box’. Set the Text Box fill to ‘None’ (using the ‘Shape Fill’ option) and the outline to ‘None’. Enter the name and designation of the person for whom the resume is being created into this text box. Copy this text box to add the person’s details step-by-step. Fill in details such as their profile, mobile number, address, and email/website.
Step (3):
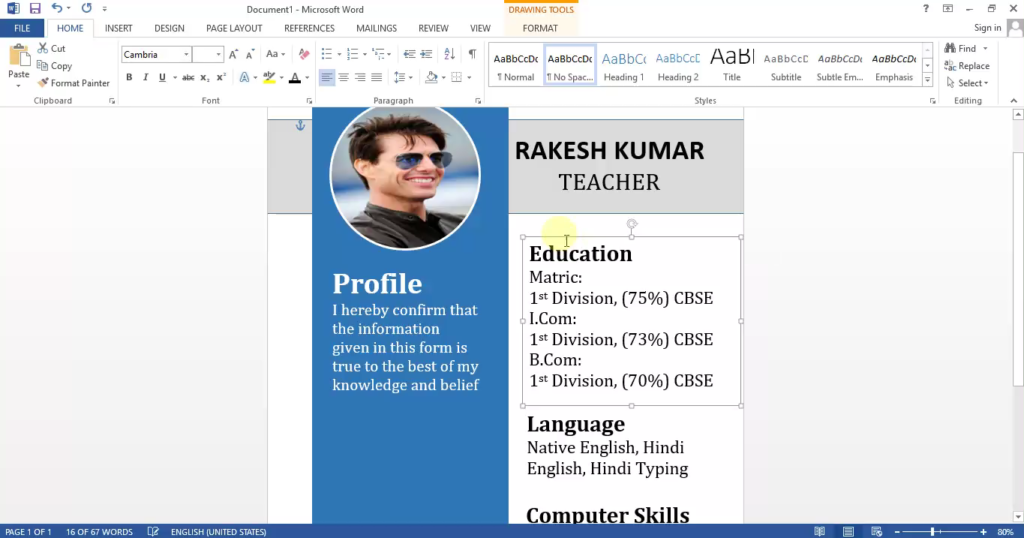
Finally, fill in their education, languages, computer skills, and experience; ensure all details are entered accurately. Since this is a professional resume, it does not include fields for gender, date of birth, or parents’ names—though you may include them if you wish.
Note:–
You can access options for text color, font size, and font selection via the ‘Home’ option in the top menu bar.
In Hindi:-
दोस्तों, आज के ब्लॉग में हम सीखेंगे कि MS Word में रिज़्यूमे कैसे बनाया जाए। रिज़्यूमे बनाने के लिए कई सॉफ्टवेयर और ऑनलाइन टूल्स उपलब्ध हैं, लेकिन आज हम MS Word का इस्तेमाल करके इसे बनाने पर ध्यान देंगे। MS Word में आप बहुत कुछ कस्टमाइज़ कर सकते हैं—बिल्कुल खास डिज़ाइन सॉफ्टवेयर की तरह—जिससे आप शेप्स और कर्व्ड डिज़ाइन बना सकते हैं, इमेज डाल सकते हैं, ग्रेडिएंट कलर्स लगा सकते हैं और भी बहुत कुछ कर सकते हैं। MS Word में आप आसानी और सटीकता के साथ कई चीज़ें डिज़ाइन कर सकते हैं, जैसे रिज़्यूमे, बायो-डेटा शीट, कवर पेज, फ्लेक्स बैनर, विज़िटिंग कार्ड, ब्रोशर और इनविटेशन कार्ड। हम इस प्रोसेस को ऐसे सीखेंगे कि यह आसान और सीधा लगे। इसके लिए हम MS Word सॉफ्टवेयर का इस्तेमाल करेंगे; वैसे तो आप कोई भी वर्शन इस्तेमाल कर सकते हैं, लेकिन नए वर्शन (जैसे 2013, 2014, 2015 और लेटेस्ट रिलीज़) में ज़्यादा ऑप्शंस मिलते हैं।
हम इस प्रोसेस को तीन स्टेप्स में पूरा करेंगे। इस ब्लॉग को पढ़ने के बाद, साथ में दिया गया वीडियो ट्यूटोरियल ज़रूर देखें; इसका लिंक पेज के नीचे दिया गया है।
स्टेप (1):-
MS Word खोलें। ऊपर मेन्यू बार में ‘Page Layout’ टैब पर जाएं, बाईं ओर ‘Size’ चुनें और ‘A4’ सेलेक्ट करें। इसके बाद, ‘Insert’ टैब पर जाएं, ‘Shapes’ चुनें और कोई शेप सेलेक्ट करें। शेप को बाईं ओर वर्टिकली (ऊपर-नीचे) खींचें, फिर उसकी एक कॉपी बनाएं और उस कॉपी को हॉरिजॉन्टली (बाएं-दाएं) खींचें। आखिर में, फ़ोटोग्राफ़ के लिए जगह (प्लेसहोल्डर) बनाने के लिए एक गोल शेप चुनें।
स्टेप (2):-
अब, ऊपर मेन्यू बार में ‘Insert’ टैब पर जाएं और ‘Text Box’ पर क्लिक करें। टेक्स्ट बॉक्स के फ़िल को ‘None’ ( ‘Shape Fill’ ऑप्शन का इस्तेमाल करके) और आउटलाइन को ‘None’ पर सेट करें। इस टेक्स्ट बॉक्स में उस व्यक्ति का नाम और पद (डेज़िग्नेशन) लिखें जिसके लिए रिज़्यूमे बनाया जा रहा है। व्यक्ति की जानकारी को स्टेप-बाय-स्टेप जोड़ने के लिए इस टेक्स्ट बॉक्स को कॉपी करें। उनकी प्रोफ़ाइल, मोबाइल नंबर, पता और ईमेल/वेबसाइट जैसी जानकारी भरें।
स्टेप (3):
आखिर में, उनकी शिक्षा, भाषाएं, कंप्यूटर स्किल्स और अनुभव की जानकारी भरें; पक्का करें कि सभी जानकारी सही-सही भरी गई हो। चूंकि यह एक प्रोफेशनल रिज़्यूमे है, इसलिए इसमें जेंडर, जन्म तिथि या माता-पिता के नाम के लिए कोई जगह नहीं है—हालांकि, अगर आप चाहें तो इन्हें शामिल कर सकते हैं।
Note:-
आप टॉप मेनू बार में ‘होम’ ऑप्शन के ज़रिए टेक्स्ट का रंग, फ़ॉन्ट साइज़ और फ़ॉन्ट चुनने के ऑप्शन इस्तेमाल कर सकते हैं।
Video Tutorial:- https://youtu.be/HAV-Y8SZl-U