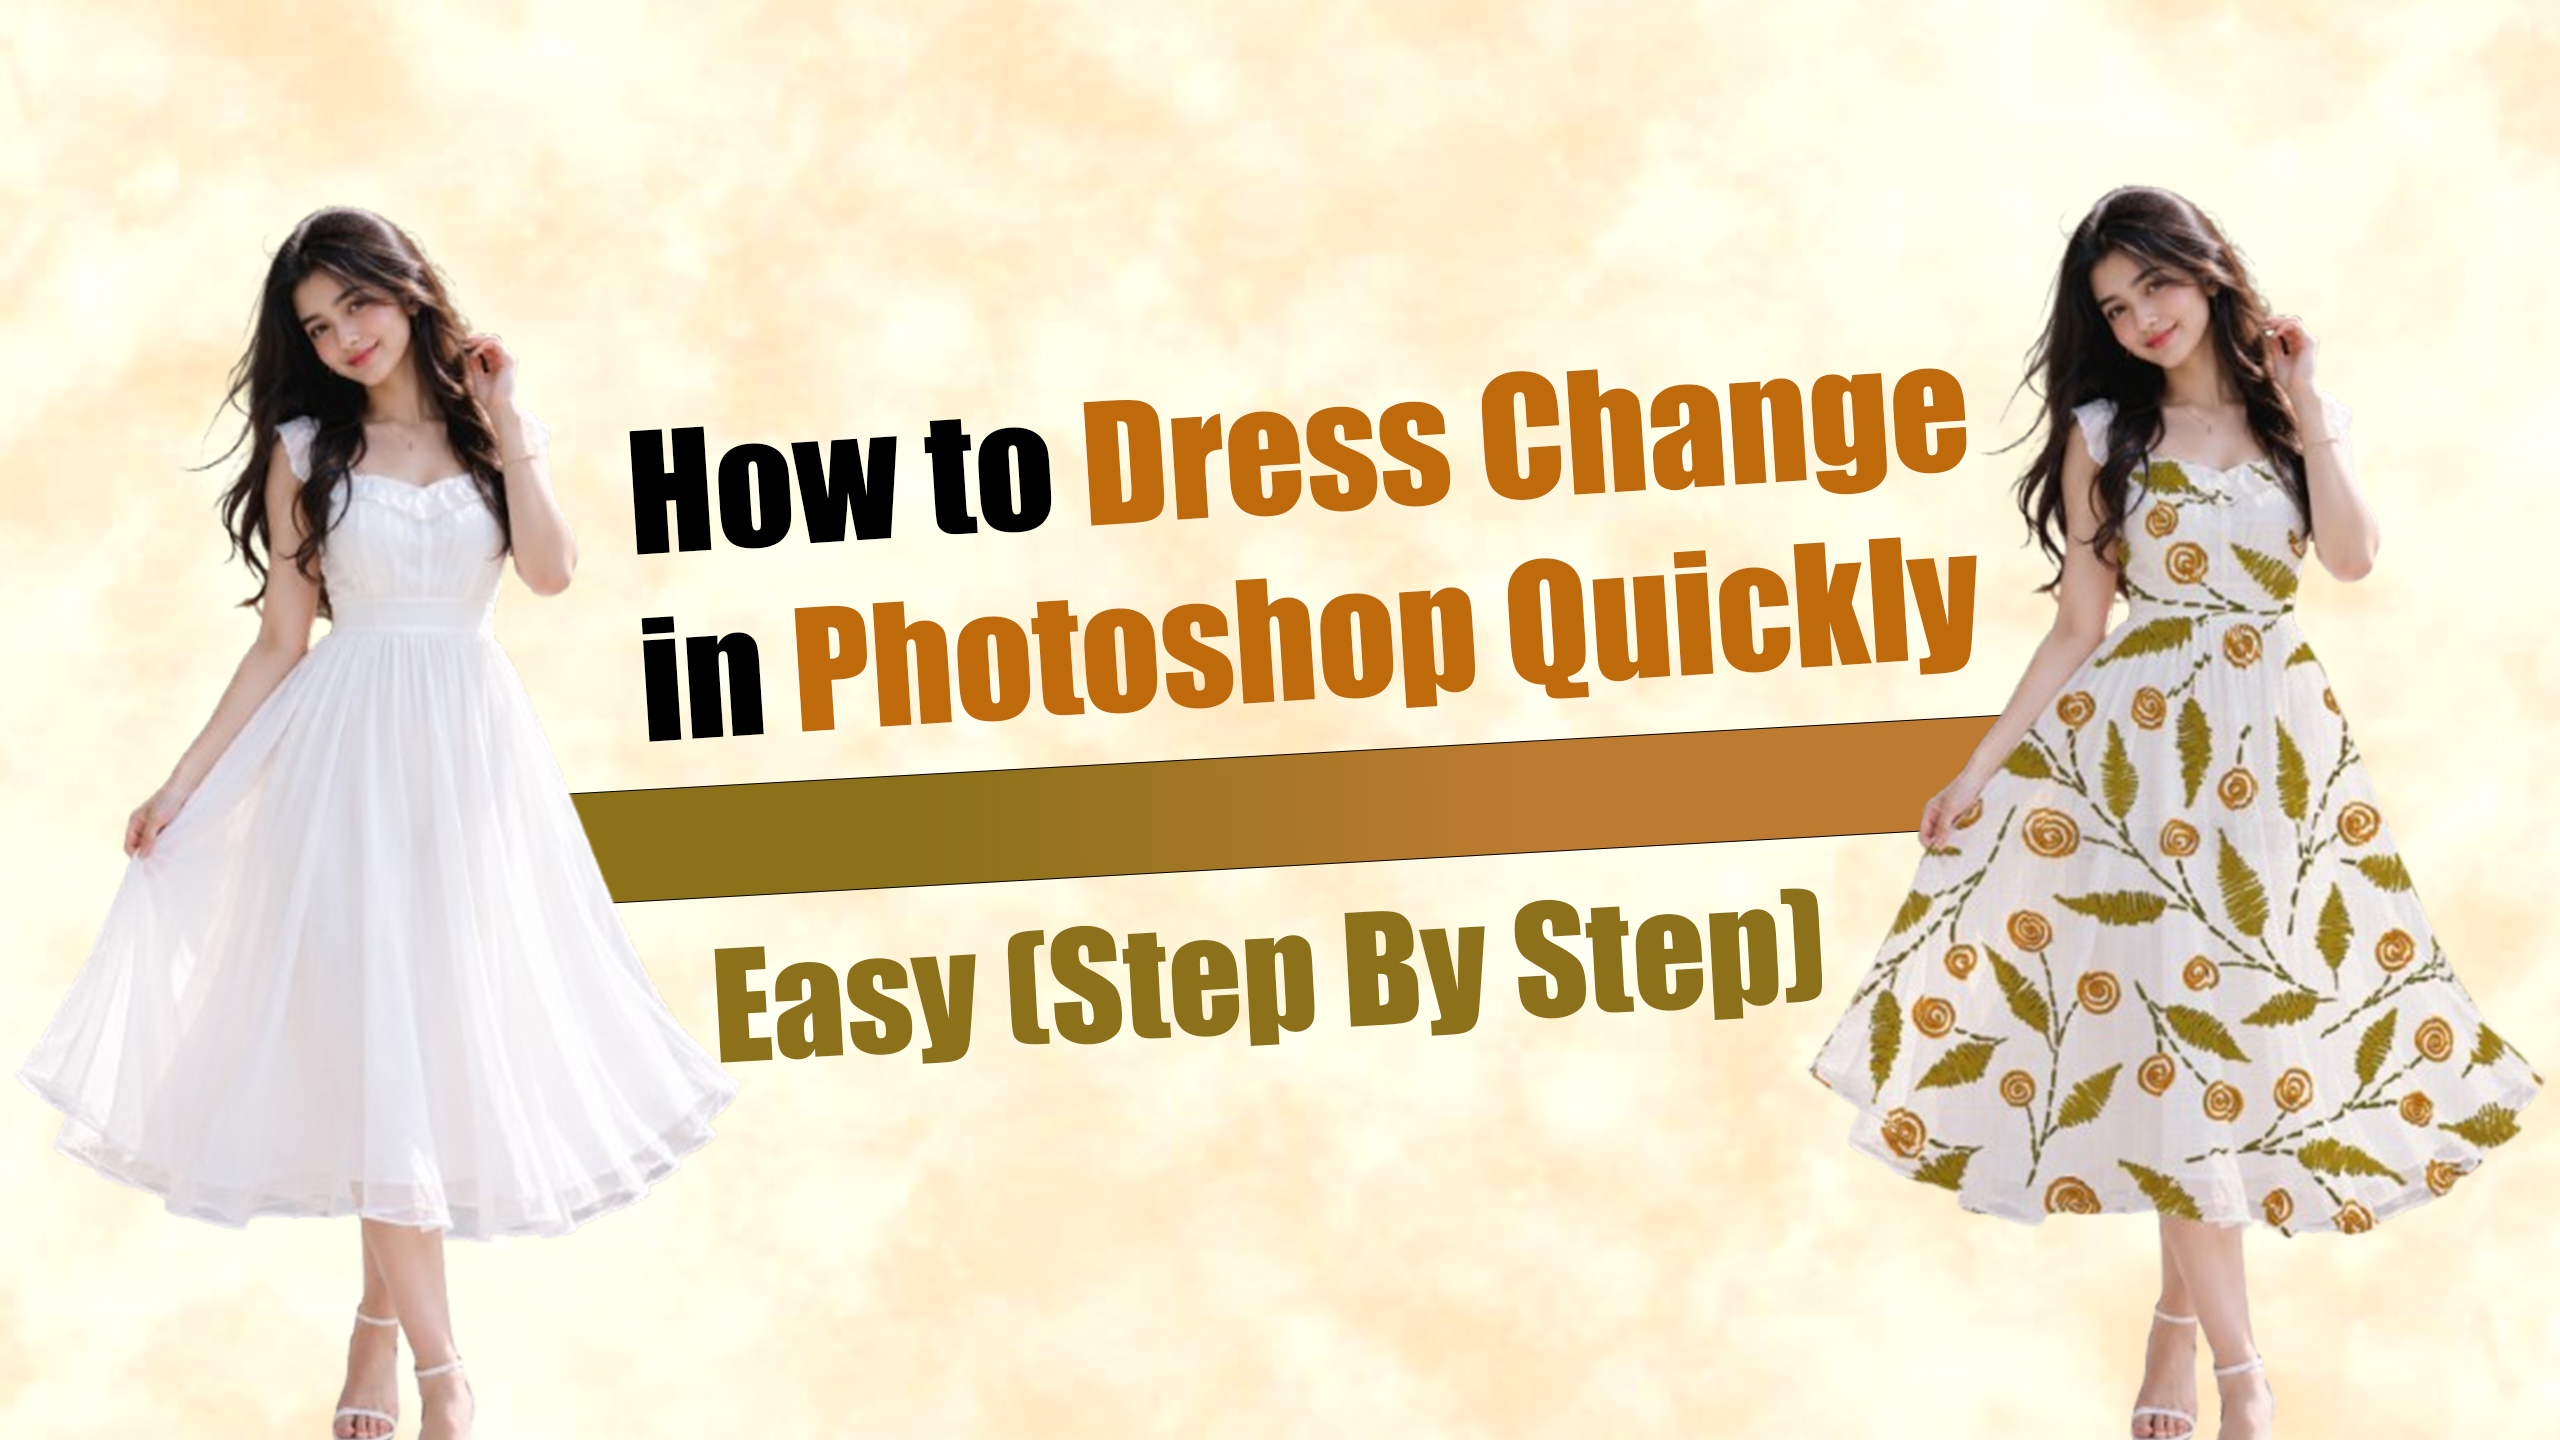
How to Dress Change in Photoshop Quick (Easily Step By Step)
Friends, in this blog post, we will learn how to change the design of any outfit. We will accomplish this with great ease and absolute perfection—so flawlessly, in fact, that it will be completely undetectable. To do this, we will utilize Adobe Photoshop Software. It is highly recommended that you work with a newer version of Photoshop (such as versions 19, 20, 23, or any subsequent latest releases), as the software performs more efficiently and produces superior graphics in these updated versions. So, let’s learn how to do this in 5 simple steps:
Step (1):-
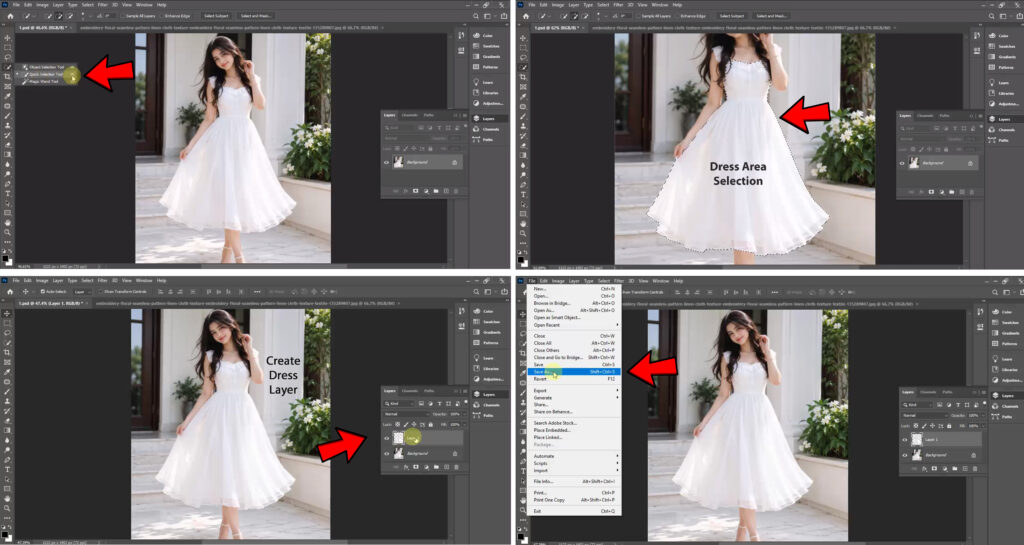
Select the layer, navigate to the Toolbar, choose the “Quick Selection Tool,” and create a selection of the dress layer.
Step (2):-
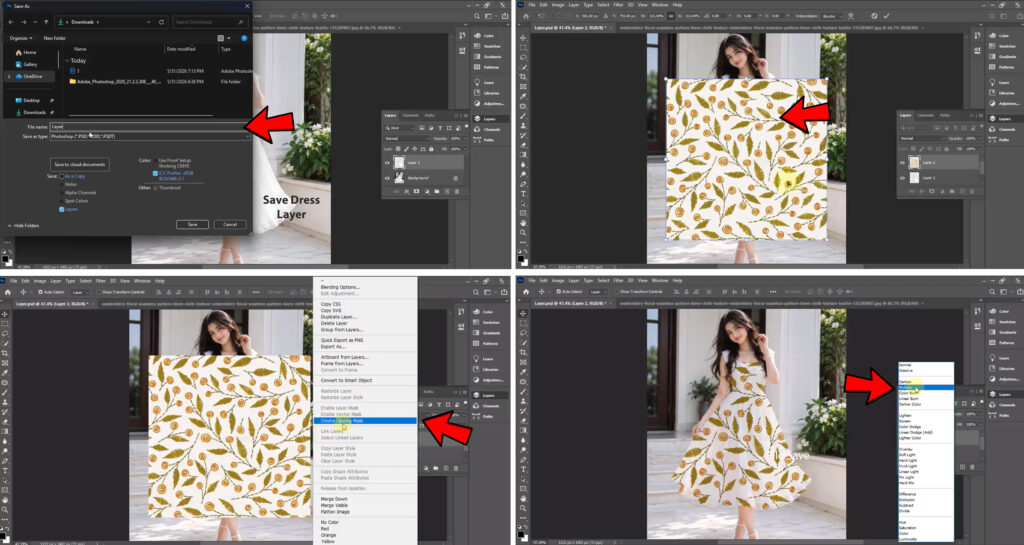
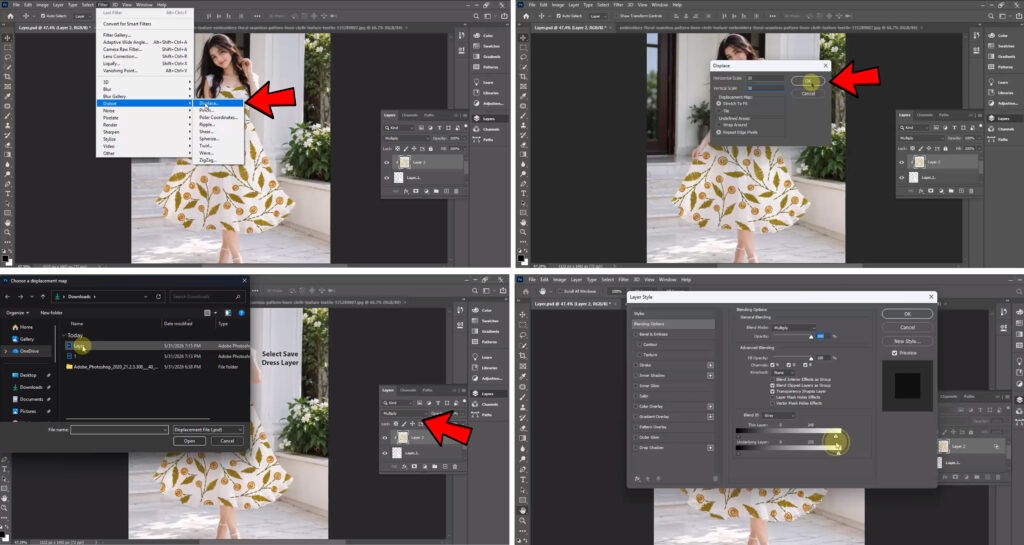
Create a duplicate copy of the selected dress layer. Now, with this copied layer selected, go to the “Edit” menu in the top Menu Bar and use the “Save As” command to save the file as a “New Dress Layer,” giving it any name you prefer.
Step (3):-
Now, import any design onto this new layer, right-click on it, and select “Create Clipping Mask.”
Step (4):-
Right-click on the “Change Dress Layer,” then click on “Add a Layer Style” (located on the right side) and select the “Multiply” blending option.
Step (5):-
With the “Change Dress Layer” still selected, go to the “Filter” option in the top Menu Bar. From the dropdown, select “Distort,” and then choose the “Displace” option. A dialog box will appear; enter the values ”30″ and “30” into the respective fields and click “OK.” Another dialog box will then open; locate and select the file you previously saved as “New Dress Layer” in Step 2, and click the “Open” button. Finally, right-click on the layer again and use the “Layer Style” options to make any necessary fine-tuning adjustments.
In Hindi
दोस्तों, इस ब्लॉग पोस्ट में हम सीखेंगे कि किसी भी आउटफिट का डिज़ाइन कैसे बदला जाता है। हम यह काम बहुत आसानी से और पूरी परफेक्शन के साथ करेंगे—इतनी सफ़ाई से कि किसी को पता भी नहीं चलेगा। ऐसा करने के लिए, हम Adobe Photoshop सॉफ़्टवेयर का इस्तेमाल करेंगे। हमारा सुझाव है कि आप Photoshop के किसी नए वर्शन (जैसे 19, 20, 23, या इसके बाद के किसी भी लेटेस्ट वर्शन) पर काम करें, क्योंकि इन अपडेटेड वर्शन में सॉफ़्टवेयर ज़्यादा बेहतर तरीके से काम करता है और बेहतर ग्राफ़िक्स बनाता है। तो चलिए, 5 आसान स्टेप्स में सीखते हैं कि यह कैसे किया जाता है:
स्टेप (1):-
लेयर को चुनें, टूलबार पर जाएँ, “Quick Selection Tool” चुनें, और ड्रेस वाली लेयर का सिलेक्शन बनाएँ।
स्टेप (2):-
चुनी हुई ड्रेस लेयर की एक डुप्लीकेट कॉपी बनाएँ। अब, इस कॉपी की हुई लेयर को चुनकर, ऊपर के मेनू बार में “Edit” मेनू पर जाएँ और “Save As” कमांड का इस्तेमाल करके फ़ाइल को “New Dress Layer” के तौर पर सेव करें; आप इसे अपनी पसंद का कोई भी नाम दे सकते हैं।
स्टेप (3):-
अब, इस नई लेयर पर कोई भी डिज़ाइन इम्पोर्ट करें, उस पर राइट-क्लिक करें, और “Create Clipping Mask” चुनें।
स्टेप (4):-
“Change Dress Layer” पर राइट-क्लिक करें, फिर “Add a Layer Style” (जो दाईं ओर होता है) पर क्लिक करें और “Multiply” ब्लेंडिंग ऑप्शन चुनें।
स्टेप (5):-
“Change Dress Layer” को अभी भी चुने हुए रखते हुए, ऊपर के मेनू बार में “Filter” ऑप्शन पर जाएँ। ड्रॉपडाउन से, “Distort” चुनें, और फिर “Displace” ऑप्शन चुनें। एक डायलॉग बॉक्स खुलेगा; संबंधित फ़ील्ड्स में “30” और “30” वैल्यू डालें और “OK” पर क्लिक करें। फिर एक और डायलॉग बॉक्स खुलेगा; उस फ़ाइल को ढूँढ़ें और चुनें जिसे आपने स्टेप 2 में “New Dress Layer” के तौर पर सेव किया था, और “Open” बटन पर क्लिक करें। आखिर में, लेयर पर फिर से राइट-क्लिक करें और कोई भी ज़रूरी बारीक बदलाव करने के लिए “Layer Style” ऑप्शन्स का इस्तेमाल करें।
वीडियो ट्यूटोरियल:- इसके साथ दिया गया वीडियो ट्यूटोरियल देखने से आपको इस प्रक्रिया की ज़्यादा साफ़ समझ मिलेगी। आप इस लिंक पर क्लिक करके वीडियो देख सकते हैं।
Video Tutorial:- https://youtu.be/75nBOVr93v8?si=p0Af9sfU_JjxRWAP
Watching the accompanying video tutorial will provide you with a much clearer understanding of this process. You can watch the video by clicking on this link.