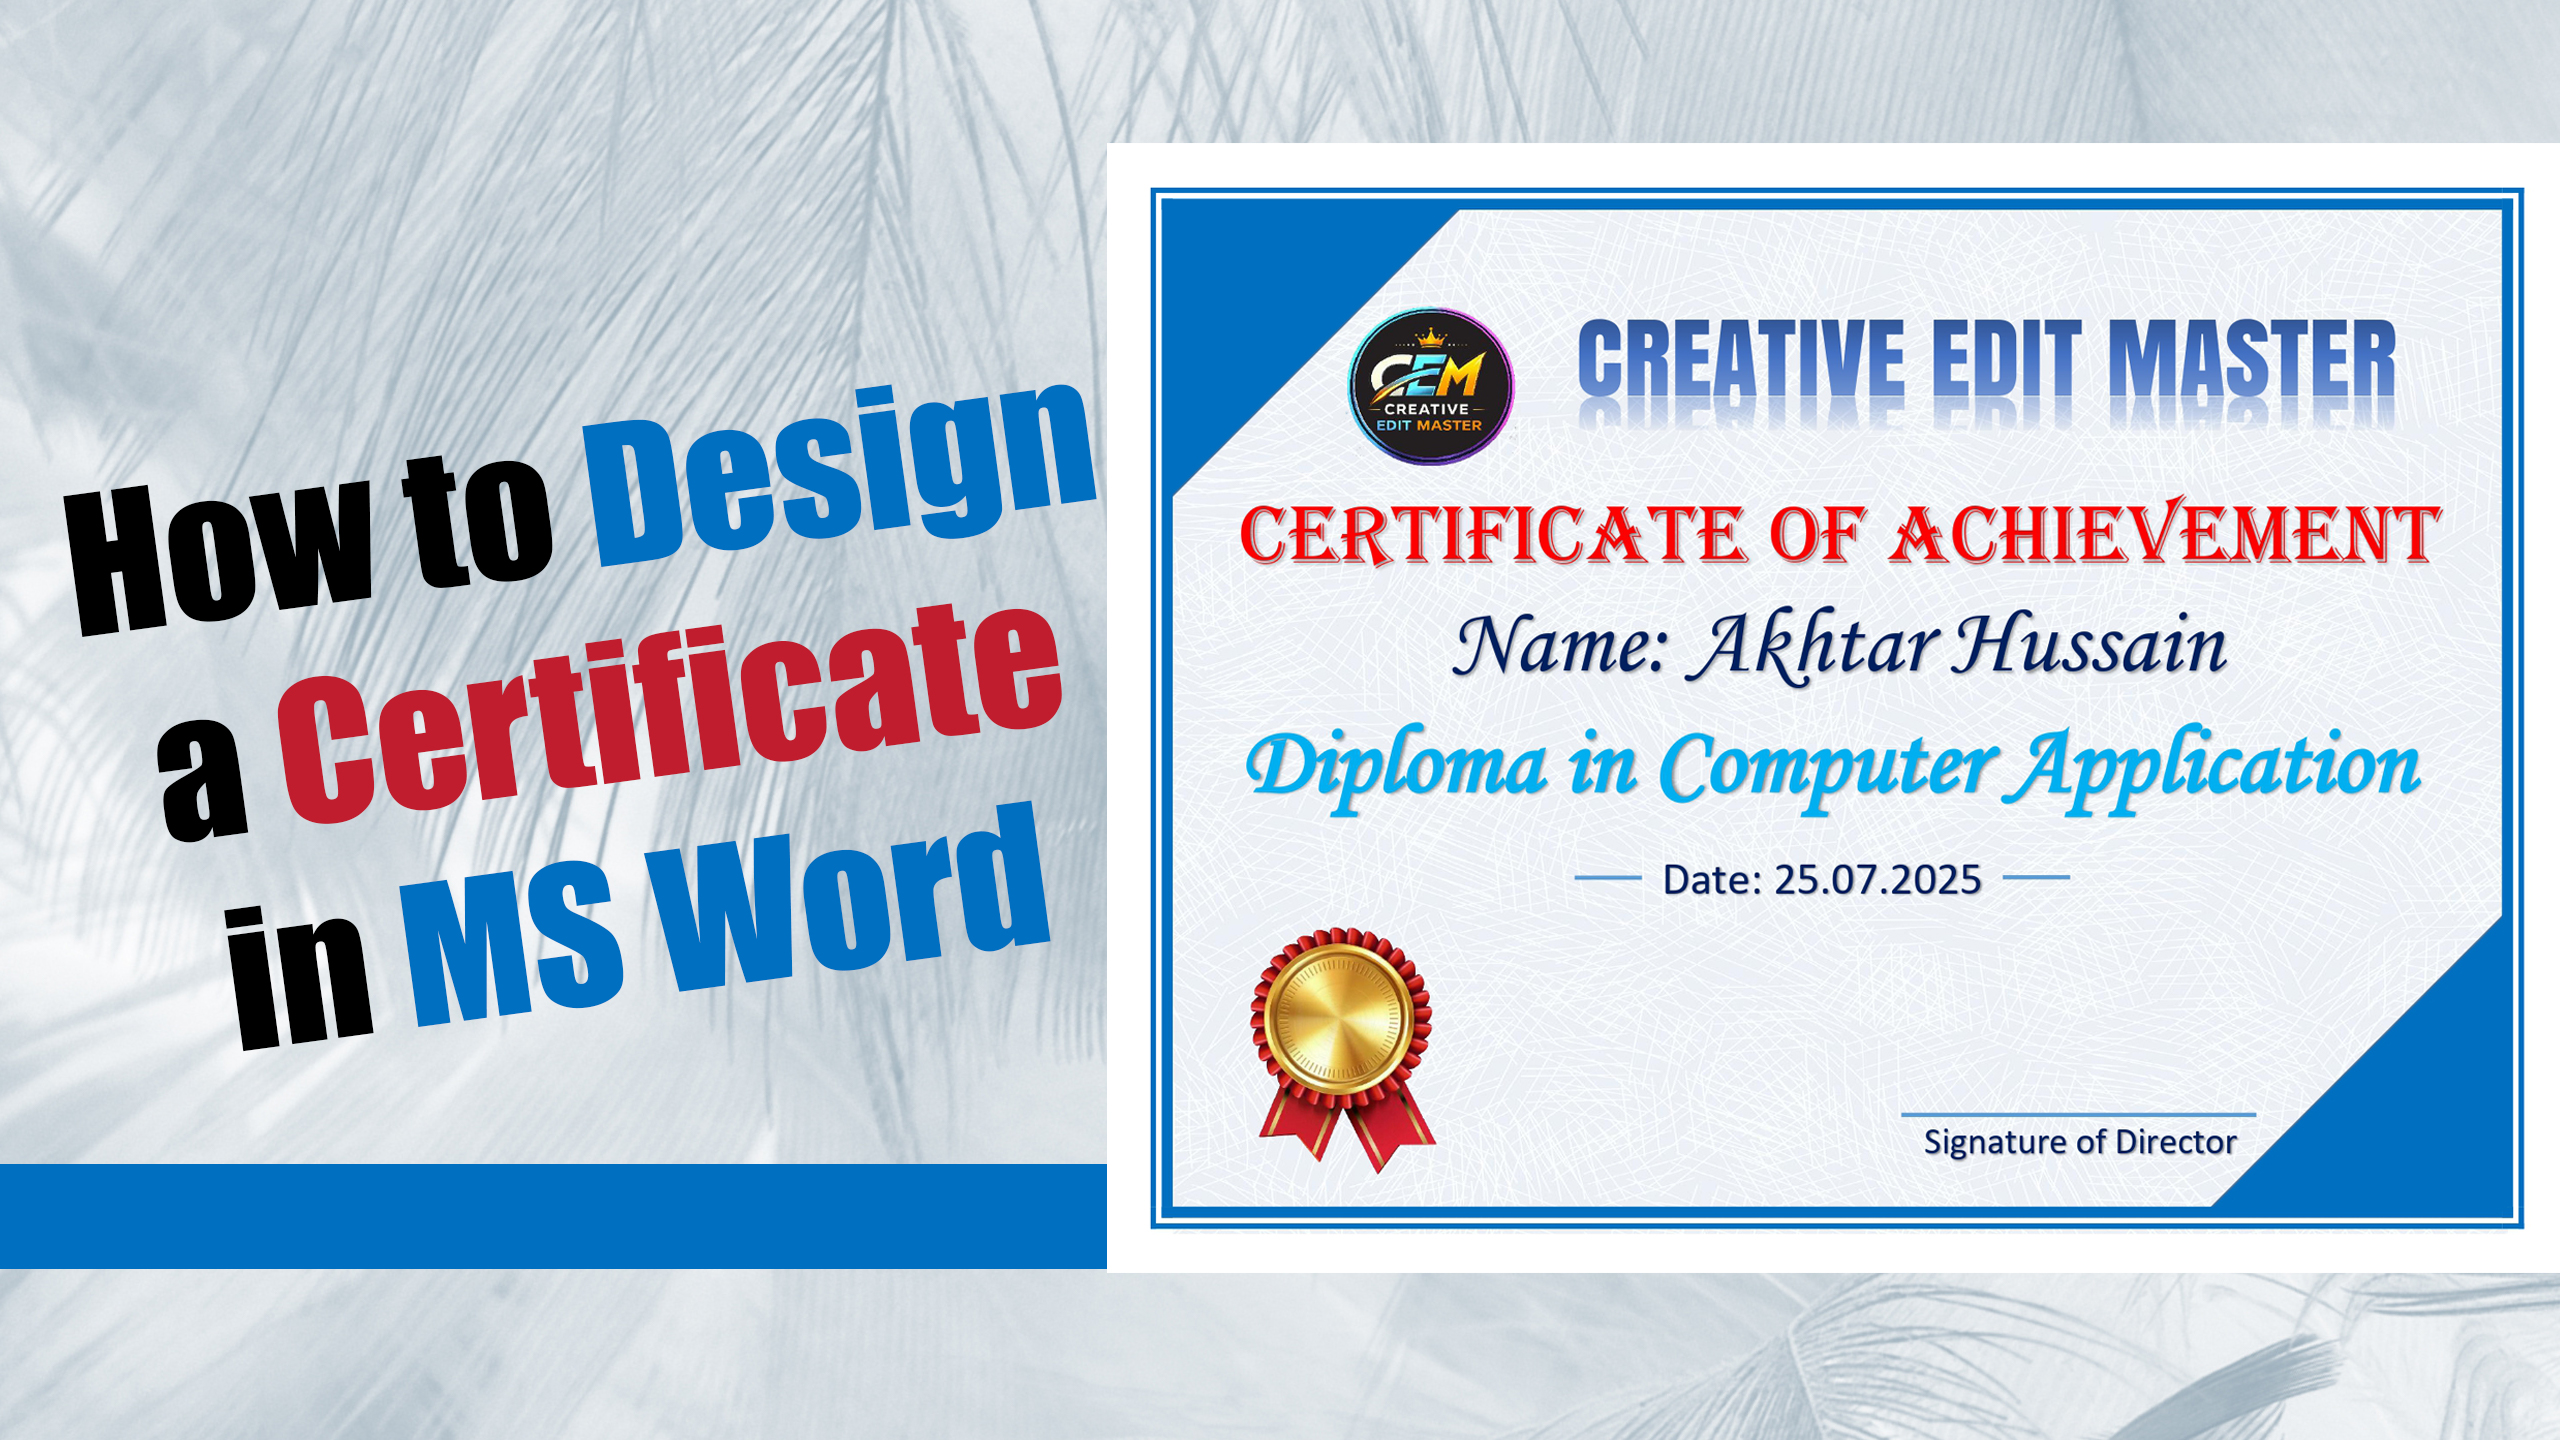
Friends, in today’s blog, we will learn how to design a certificate in MS Word. While there are many software programs available for creating certificates—and they can also be made online or using tools like CorelDRAW or Photoshop—today we will focus on creating one in MS Word. Just like other specialized software, MS Word allows for extensive customization, such as creating shapes and curved designs, inserting images, applying gradient colors, and much more. You can create various other designs in MS Word as well, such as resumes, bio-data sheets, cover pages, flex banners, school or staff ID cards, brochures, and invitation cards, all with great ease and precision. We will learn the process in such a way that it feels completely simple. We will be using the MS Word software for this; while you can use any version, newer versions (like 2013, 2014, 2015, or the latest releases) offer more options.
We will cover this process in five steps. After reading this blog, be sure to watch the accompanying video tutorial; you can find the link at the bottom of the page.
Step (1):-
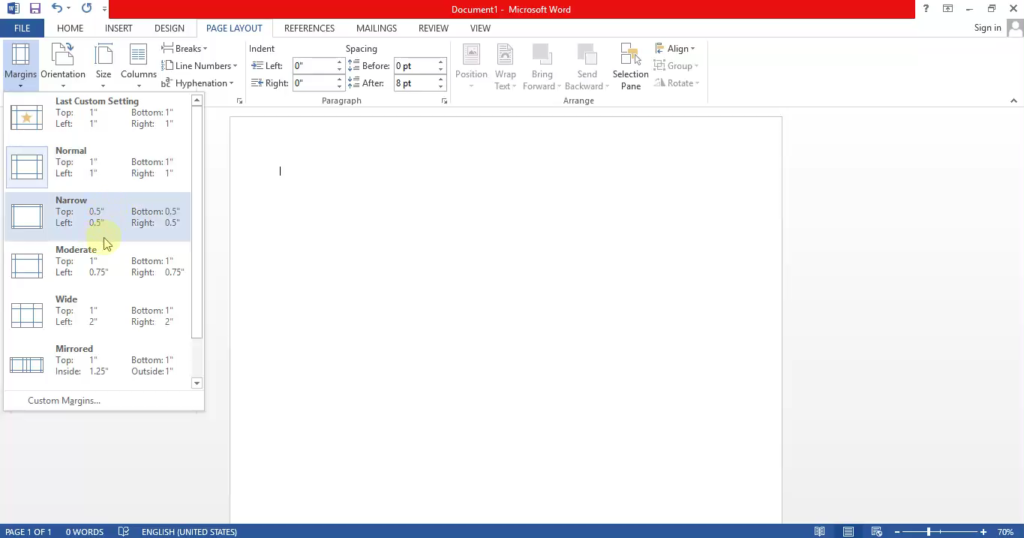
First, open MS Word and create a new page using the shortcut `Ctrl + N`. Go to the ‘Page Layout’ option in the top menu bar, select ‘Orientation’ from the left side, and choose ‘Landscape’. Set the zoom level to 70% (found at the bottom right) so the page fits well on your screen. Next, go to the ‘Margins’ option nearby and select ‘Narrow’.
Step (2):-
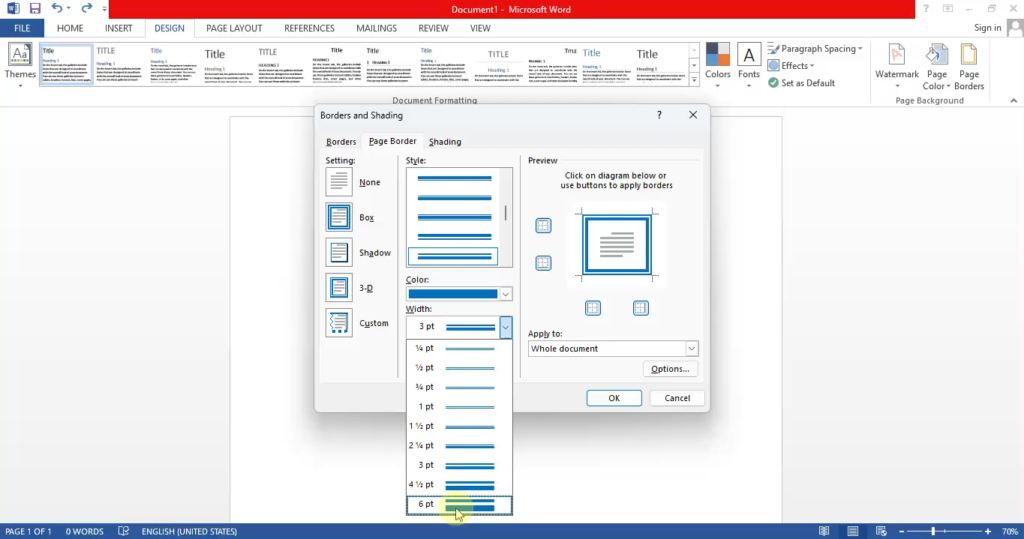
Go to the ‘Design’ option in the top menu bar and click on ‘Page Borders’ (located at the far right). Select the type of border you want, choose your preferred color and width, and then click ‘OK’.
Step (3):-
Go to the ‘Insert’ option in the top menu bar, click on ‘Shapes’, select the triangle shape, and position it at the top-left corner; then, copy this shape and place it at the bottom-right corner. Next, go to the ‘Insert’ option again, click on ‘Picture’, select a texture to insert, and fit it neatly in the center of the page. After that, click on ‘Picture’ under the ‘Insert’ option and select a logo; go to the ‘Layout’ options and choose ‘In Front of Text’ so that the logo can be moved anywhere on the page.
Step (4):-
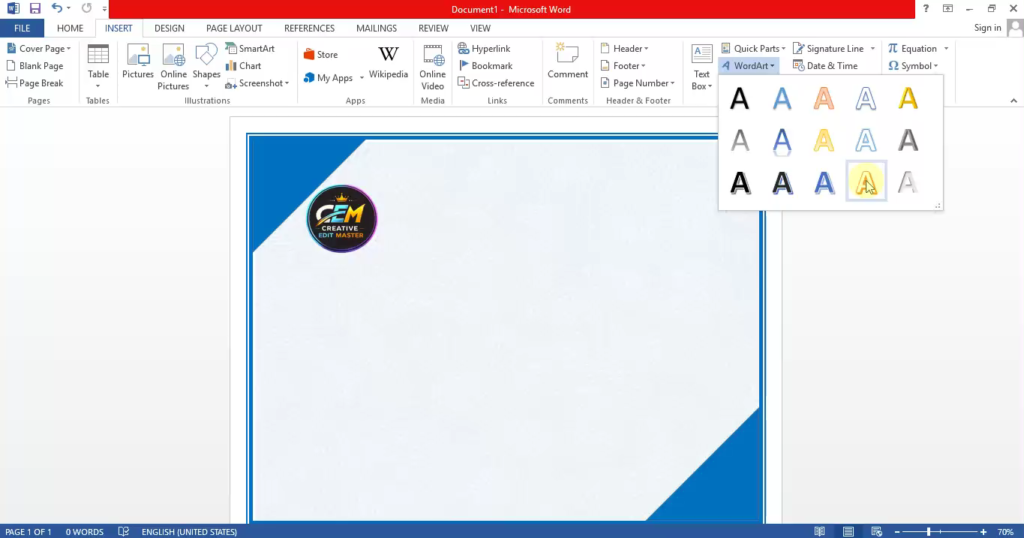
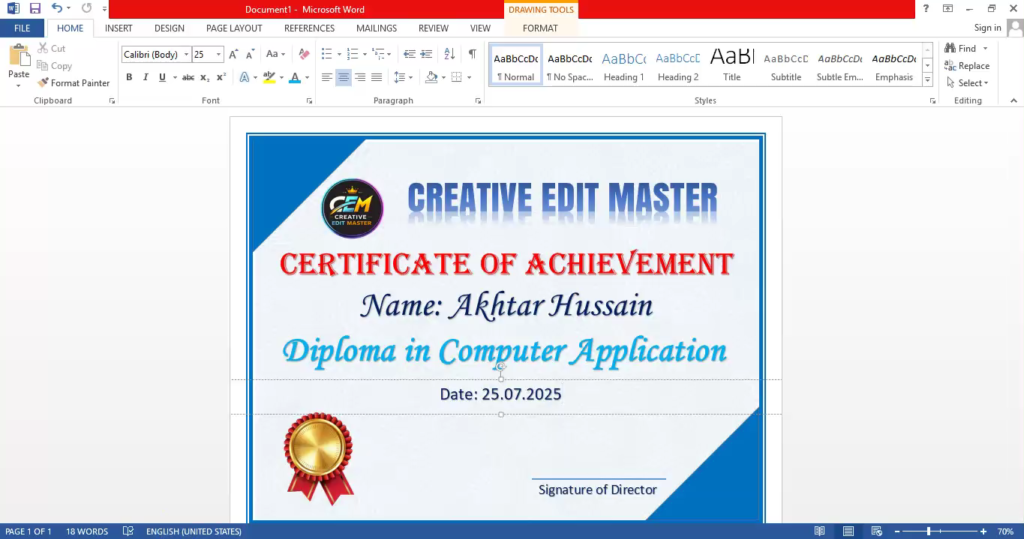
To add a heading, go to the ‘Insert’ option on the right side of the top menu bar, click on ‘WordArt’, select a style, and type the heading for the certificate. Adjust the heading’s size, font, and color by going to the ‘Home’ option in the top menu bar. Similarly, add any other text required for the certificate—such as the text found on a banner—or type whatever content you prefer.
Step (5):-
After completing the text work, download a medal-style image from the internet or select one you already have; to do this, go to the ‘Insert’ option in the top menu bar, click on ‘Picture’, and select the medal image from the location where it is saved on your drive.
In Hindi:-
दोस्तों, आज के ब्लॉग में हम सीखेंगे कि MS Word में सर्टिफिकेट कैसे डिज़ाइन करें। वैसे तो सर्टिफिकेट बनाने के लिए कई सॉफ्टवेयर प्रोग्राम उपलब्ध हैं—और इन्हें ऑनलाइन या CorelDRAW या Photoshop जैसे टूल्स का इस्तेमाल करके भी बनाया जा सकता है—लेकिन आज हम MS Word में इसे बनाने पर ध्यान देंगे। दूसरे खास सॉफ्टवेयर की तरह ही, MS Word में भी बहुत सारे कस्टमाइज़ेशन किए जा सकते हैं, जैसे शेप्स और कर्व्ड डिज़ाइन बनाना, इमेज डालना, ग्रेडिएंट कलर लगाना, और भी बहुत कुछ। आप MS Word में कई तरह के दूसरे डिज़ाइन भी बना सकते हैं, जैसे रिज़्यूमे, बायो-डेटा शीट, कवर पेज, फ्लेक्स बैनर, स्कूल या स्टाफ़ ID कार्ड, ब्रोशर और इनविटेशन कार्ड; ये सब बहुत आसानी और सटीकता से किया जा सकता है। हम इस प्रोसेस को ऐसे सीखेंगे कि यह बिल्कुल आसान लगे। इसके लिए हम MS Word सॉफ्टवेयर का इस्तेमाल करेंगे; वैसे तो आप कोई भी वर्शन इस्तेमाल कर सकते हैं, लेकिन नए वर्शन (जैसे 2013, 2014, 2015 या लेटेस्ट रिलीज़) में ज़्यादा ऑप्शन मिलते हैं।
हम इस प्रोसेस को पाँच स्टेप्स में पूरा करेंगे। इस ब्लॉग को पढ़ने के बाद, साथ में दिया गया वीडियो ट्यूटोरियल ज़रूर देखें; इसका लिंक पेज के नीचे मिल जाएगा।
स्टेप (1):-
सबसे पहले, MS Word खोलें और शॉर्टकट `Ctrl + N` का इस्तेमाल करके एक नया पेज बनाएँ। ऊपर मेनू बार में ‘Page Layout’ ऑप्शन पर जाएँ, बाईं ओर से ‘Orientation’ चुनें और ‘Landscape’ सेलेक्ट करें। ज़ूम लेवल को 70% पर सेट करें (जो नीचे दाईं ओर होता है) ताकि पेज आपकी स्क्रीन पर ठीक से दिखे। इसके बाद, पास ही मौजूद ‘Margins’ ऑप्शन पर जाएँ और ‘Narrow’ सेलेक्ट करें।
स्टेप (2):-
ऊपर मेनू बार में ‘Design’ ऑप्शन पर जाएँ और ‘Page Borders’ (जो सबसे दाईं ओर होता है) पर क्लिक करें। अपनी पसंद का बॉर्डर टाइप, कलर और चौड़ाई चुनें, और फिर ‘OK’ पर क्लिक करें।
स्टेप (3):-
ऊपर मेनू बार में ‘Insert’ ऑप्शन पर जाएँ, ‘Shapes’ पर क्लिक करें, ट्राएंगल (triangle) शेप चुनें और उसे ऊपर-बाईं ओर (top-left corner) रखें; फिर, इस शेप को कॉपी करें और नीचे-दाईं ओर (bottom-right corner) रखें। इसके बाद, फिर से ‘Insert’ ऑप्शन पर जाएं, ‘Picture’ पर क्लिक करें, डालने के लिए कोई टेक्सचर चुनें और उसे पेज के बीच में अच्छी तरह से सेट करें। फिर, ‘Insert’ ऑप्शन के अंदर ‘Picture’ पर क्लिक करें और एक लोगो चुनें; ‘Layout’ ऑप्शन में जाएं और ‘In Front of Text’ चुनें ताकि लोगो को पेज पर कहीं भी ले जाया जा सके।
स्टेप (4):-
हेडिंग जोड़ने के लिए, टॉप मेन्यू बार के दाईं ओर ‘Insert’ ऑप्शन पर जाएं, ‘WordArt’ पर क्लिक करें, कोई स्टाइल चुनें और सर्टिफिकेट के लिए हेडिंग टाइप करें। टॉप मेन्यू बार में ‘Home’ ऑप्शन पर जाकर हेडिंग का साइज़, फ़ॉन्ट और रंग एडजस्ट करें। इसी तरह, सर्टिफिकेट के लिए ज़रूरी कोई भी दूसरा टेक्स्ट जोड़ें—जैसे बैनर पर लिखा टेक्स्ट—या अपनी पसंद का कोई भी कंटेंट टाइप करें।
स्टेप (5):-
टेक्स्ट का काम पूरा करने के बाद, इंटरनेट से मेडल-स्टाइल वाली इमेज डाउनलोड करें या पहले से मौजूद कोई इमेज चुनें; ऐसा करने के लिए, टॉप मेन्यू बार में ‘Insert’ ऑप्शन पर जाएं, ‘Picture’ पर क्लिक करें और अपनी ड्राइव पर सेव की गई जगह से मेडल इमेज चुनें।
Video Tutorial:-https://youtu.be/QJThUBGqWIY