Easy Learn (Step By Step) in Photoshop
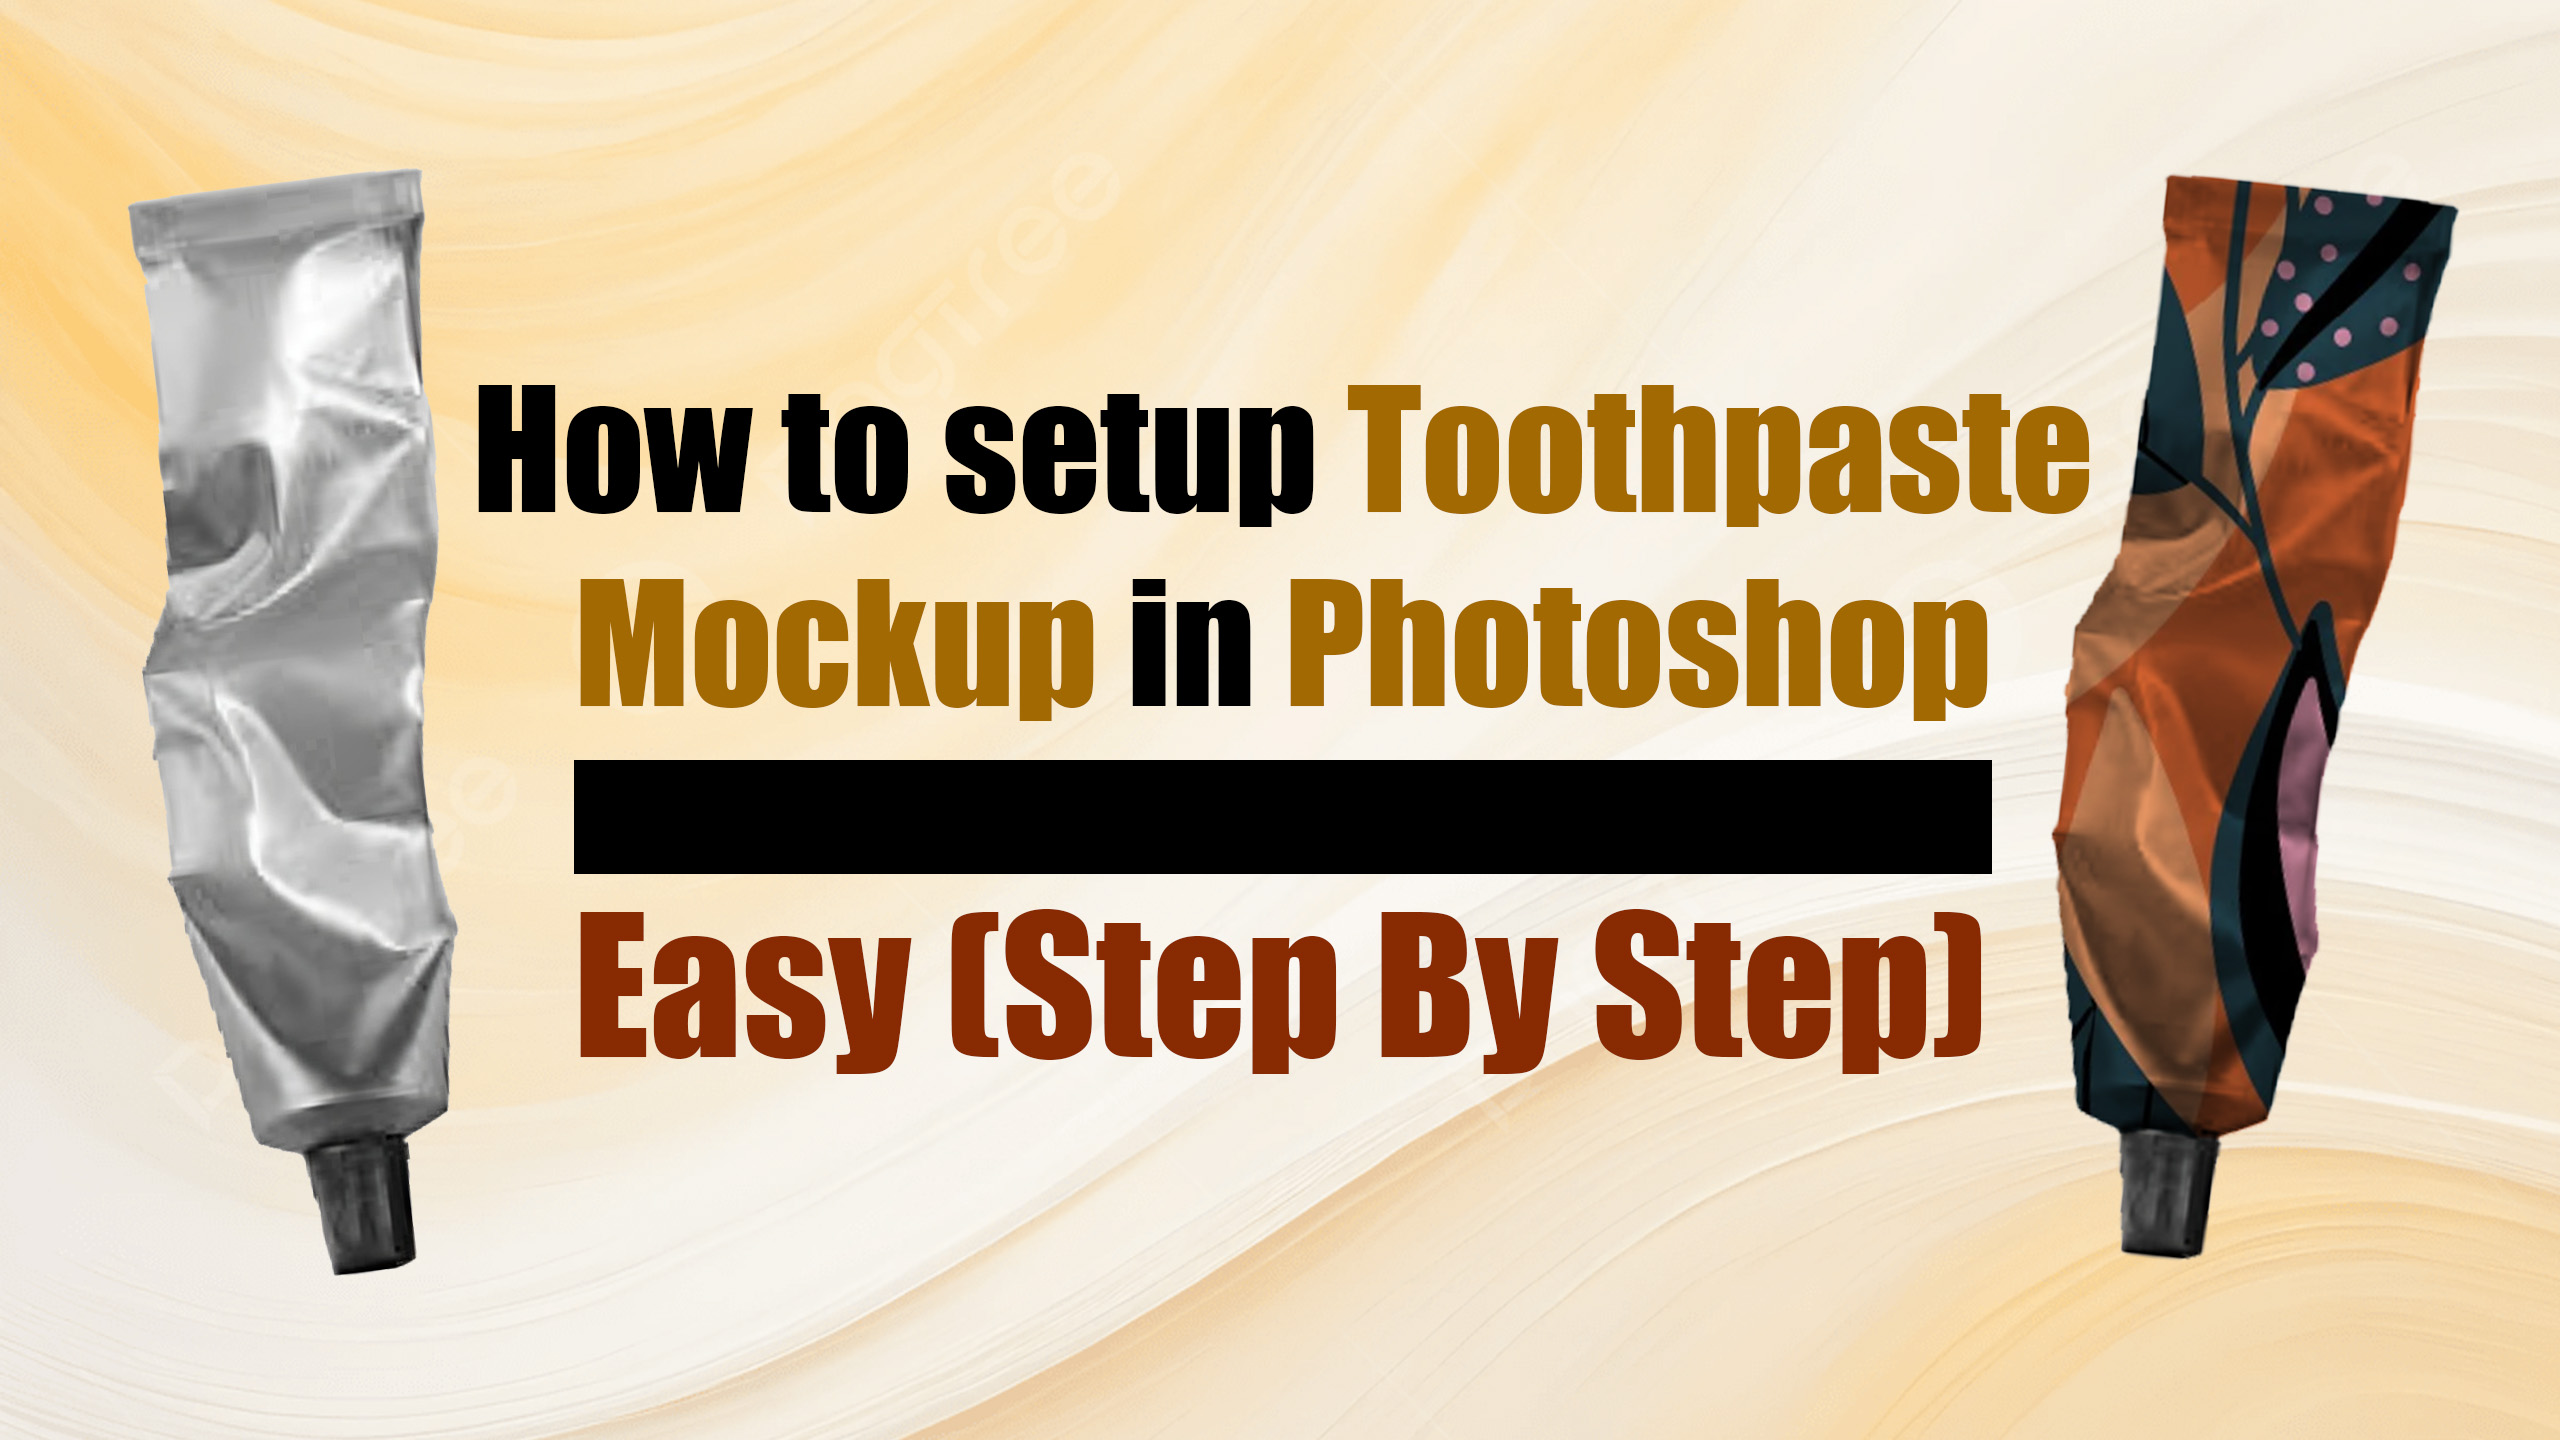
Friends, in this blog post, we will learn—in a very unique way—how to apply a mockup to a blank toothpaste tube. We will demonstrate this process using Photoshop across 12 steps, and you will also find an accompanying video tutorial.
Step: (1)
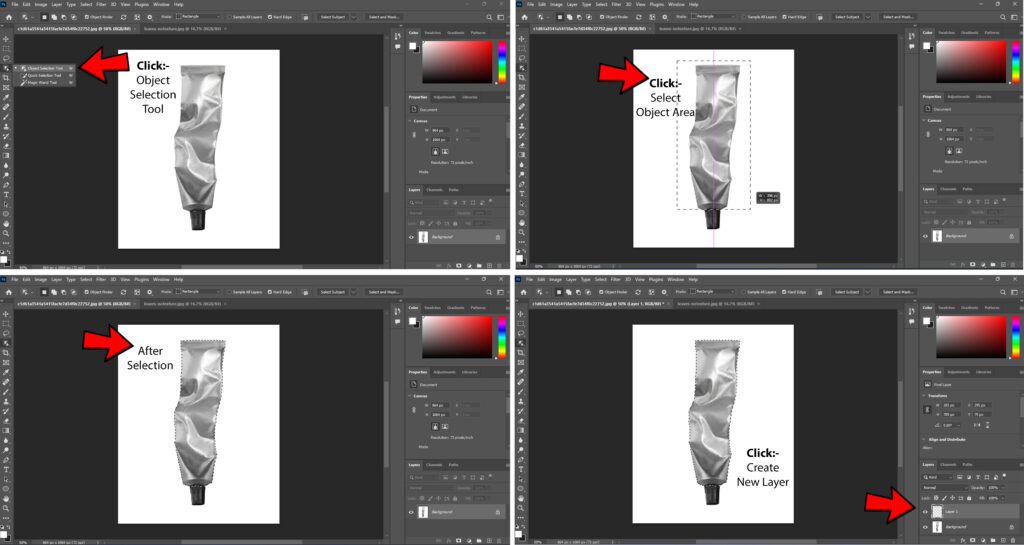
Open the blank toothpaste tube image in Photoshop. Then, click on the “Quick Object Selection Tool” located in the left-side toolbar.
Step: (2)
Now, use the Quick Object Selection Tool to select the specific area of the tube where you want to apply the design.
Step: (3)
After selecting the area using the Quick Object Selection Tool, the selected region of the tube should appear something like this.
Step: (4)
Next, create a new layer for the tube.
Step: (5)
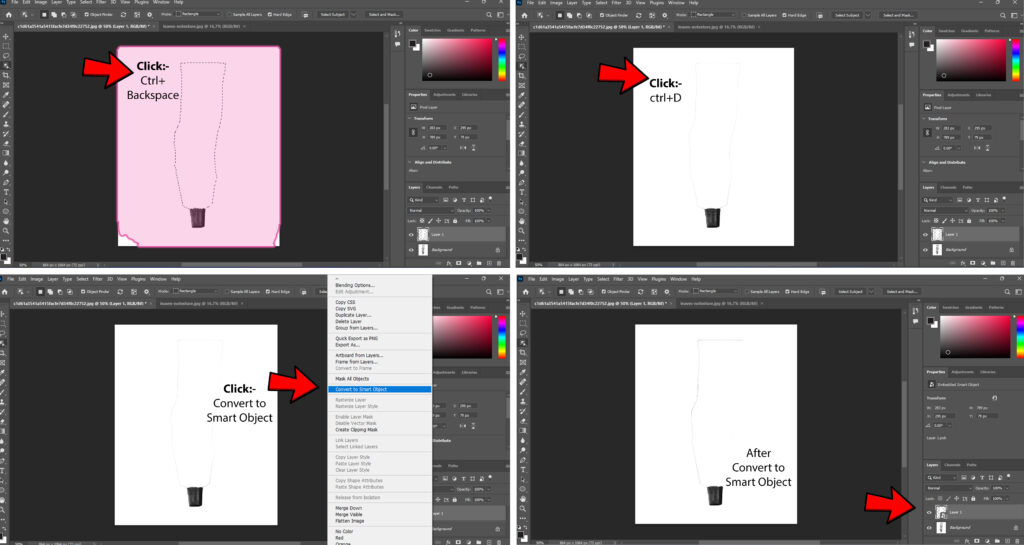
With the new tube layer selected, press “Ctrl + Backspace”; the tube should now appear in white.
Step: (6)
Afterward, deselect the tube’s selection area by pressing “Ctrl + D”.
Step: (7)
Now, convert the new tube layer into a “Smart Object.”
Step: (8)
Double-click on the new tube layer; it should now be successfully converted into a Smart Object.
Step: (9)
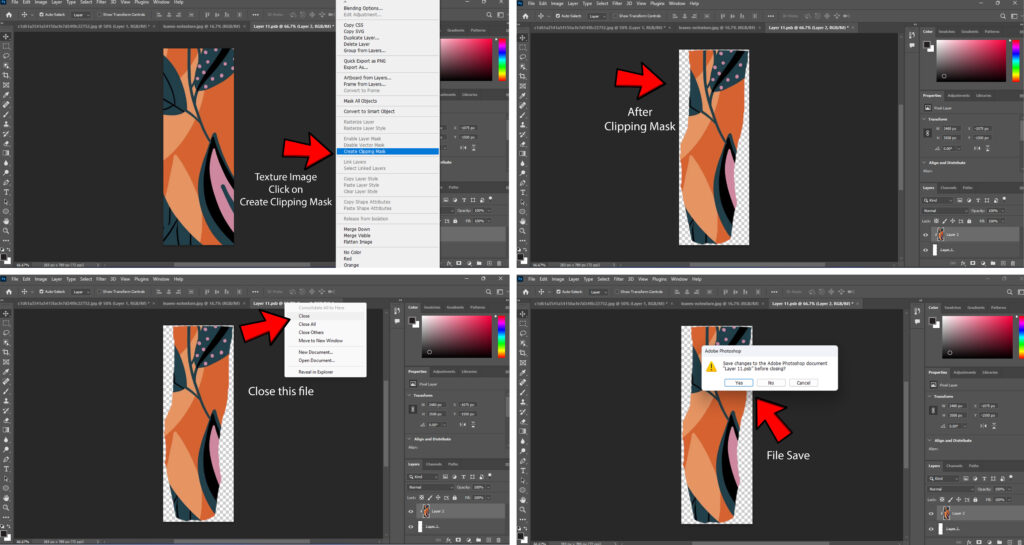
Select any texture of your choice and apply a “Create Clipping Mask” to it on the new layer.
Step: (10)
Once you have applied the “Create Clipping Mask” to the new tube layer, click the “Close” button on the tab and save the changes.
Step: (11)
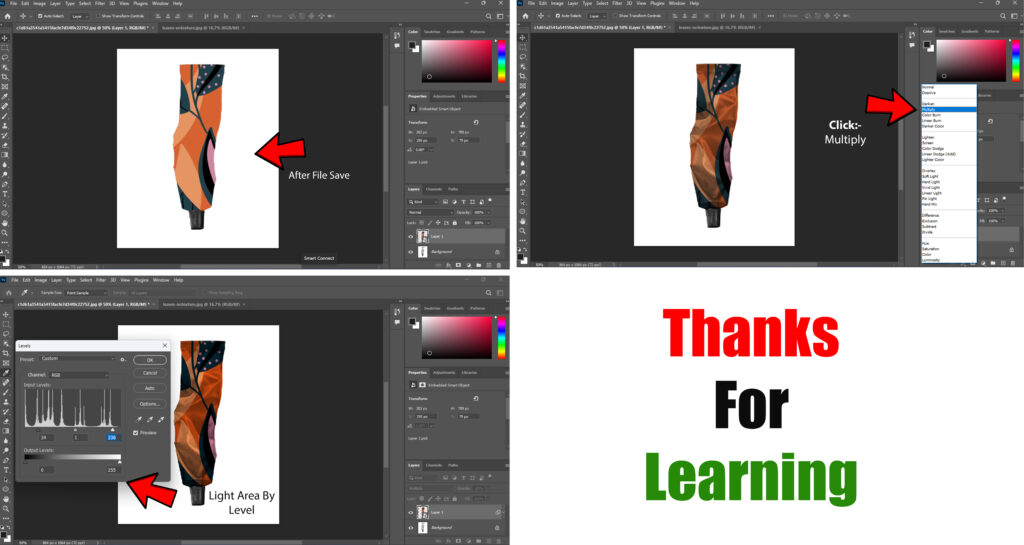
Now, on the new tube layer, change the Blending Mode from “Normal” to “Multiply” (located near the top of the Layers panel).
Step: (12)
Adjust the color lighting of the new tube layer using the “Levels” option (Ctrl + L).
Friends, we hope you have successfully learned how to apply a mockup to a toothpaste tube!
In Hindi
दोस्तो, इस ब्लॉग में हम बहुत अनोखे तरीके से सीखेंगे कि एक ब्लैंक टूथपेस्ट ट्यूब पर मॉकअप कैसे लगाएंगे जैसे हम फोटोशॉप के जरीये 12 स्टेप में बताएंगे साथ में आपको इसका एक वीडियो ट्यूटोरियल भी मिलेगा
स्टेप 1)
ब्लैंक टूथपेस्ट ट्यूब को फोटोशॉप में खोलें करेन उसके बाद बाईं ओर बार में क्विक ऑब्जेक्ट सिलेक्शन टूल पर क्लिक करें करेन
चरण दो)
अब ट्यूब को क्विक ऑब्जेक्ट सिलेक्शन टूल से जितना चाहिए उतना एरिया सिलेक्शन करें
चरण:- (3)
क्विक ऑब्जेक्ट सिलेक्शन टूल से एरिया सेलेक्ट करने के बाद ट्यूब का एरिया कुछ इस तरह से सेलेक्ट होगा
चरण 4)
इसके बाद ट्यूब का नया लेयर बनाएं
चरण:- (5)
ट्यूब के नए लेयर पर Ctrl+Backspace पर बटन दबाए उसके बाद ट्यूब व्हाइट कलर में शो होगा
चरण:- (6)
इसके बाद ट्यूब के चयन क्षेत्र को Ctrl+D से चयन हटायें
चरण:- (7)
अब ट्यूब के नए लेयर को स्मार्ट ऑब्जेक्ट में बदलें
चरण:- (8)
ट्यूब के नए लेयर पर डबल क्लिक करें करेन टैब न्यू लेयर को स्मार्ट ऑब्जेक्ट में बदलें, इसमें बदलाव होना चाहिए
चरण:- (9)
कोई सा भी एक टेक्सचर ले हमें टेक्सचर को नई लेयर पर क्रिएट क्लिपिंग मास्क लगाए
चरण:- (10)
ट्यूब के नए लेयर पर क्लिपिंग मास्क बनाएं करने के बाद टैब को क्लोज पर क्लिक करके सेव कर ले
चरण:- (11)
अब ट्यूब के नए लेयर पर थोड़ा ऊपर नॉर्मल की जगह मल्टीपल ऑप्शन चुनें करेन
चरण:- (12)
ट्यूब के नए लेयर को लेवल (Ctrl+L) ऑप्शन से कलर लाइटिंग मिलाए दोस्तों, आशा है आपने सीख लिया होगा कि एक टूथपेस्ट पर मॉकअप कैसा लगता है
Video Tutorial:- https://youtu.be/esiI5OVDp_I?si=Hp-E9sV_MHkh9hKz